Showing posts with label Cards: ANNIVERSARY. Show all posts

Sunday, October 20, 2019

Loads of Love

For my hubby...


It was for our anniversary yesterday, so he's seen it now! 

Love this cute little old truck image from Beccy's Place ... 
a digital stamp set "The Long Haul". 

I'm also entering it in her October Challenge on her 

Thanks for stopping by.


Thursday, August 24, 2017

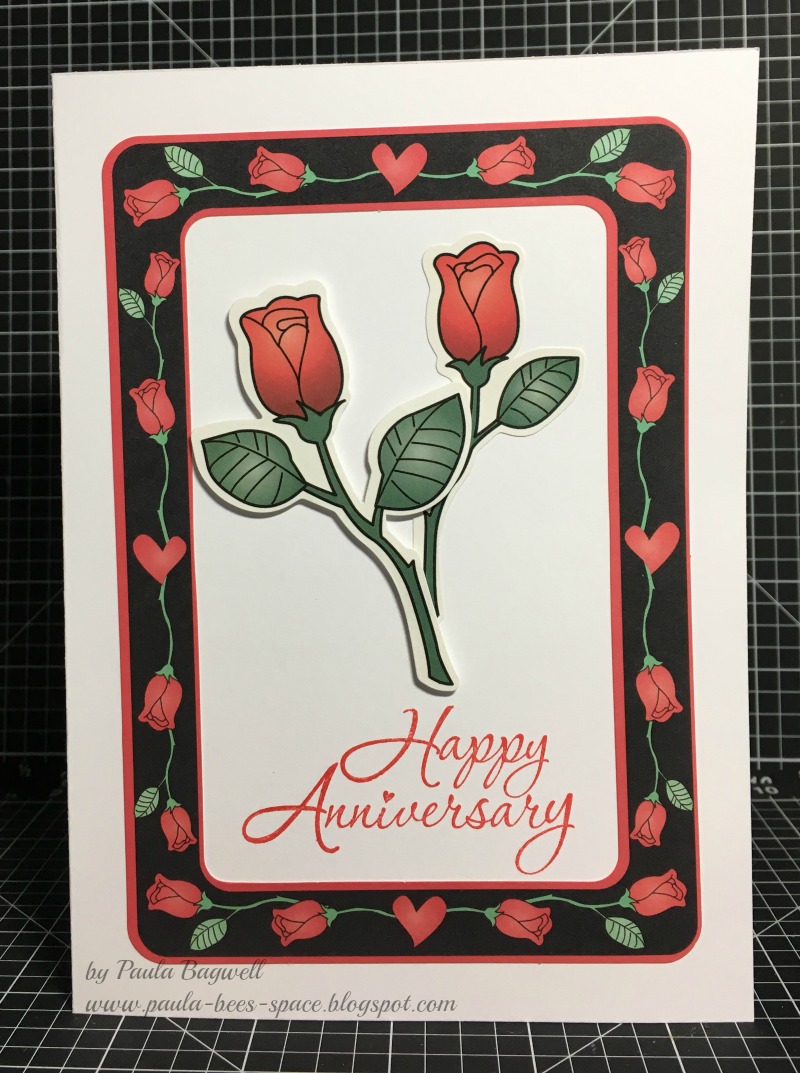
Anniversary Roses

These cards were so easy, because I didn't have to do anything but pop out these
pre-colored die-cut images and glue them to a card base! Then stamped the "Happy Anniversary" sentiment on the front or inside

(click on photos to view larger images)

the sentiment is inside on this card

I did pop-up the left rose on this one to give it some dimension.

That's all for today. Thanks for stopping by :)


Saturday, August 12, 2017

Don't Laugh!

I decided that for my very first shaker card, I would make my hubby one for our anniversary.....

This is what I used to make the shaker part... Spellbinders Hexagon dies to make a frame, but not in white..... I used gray, and a sentiment created in MS Word...... (remember the sentiment!)...


When I had it all cut out, I colored the hearts on the letters NUTS in red, ink distressed the frame edges, and added the dimensional tape, I of course had to lay it flat to fill with the shaker elements before attaching the clear acetate and frame top. This is what it looked like lying flat:


I wasn't sure I had filled it enough with Pretty Pink Posh's silver heart sequins, their clear and silver cupped sequins, and the red and clear seed beads plus tiny silver beads from my stash, but I went with it...... I wanted it to look nice when the card was standing up, when everything would fall to the bottom, so I glued a few of the elements in place. Then I stood it up!! 

Well it turns out I had PLENTY.... even MORE THAN ENOUGH.... 

Here's the  Don't Laugh! part of this post..... 
My "I'm still nuts about you" sentiment turned into:

(click on photos to view larger images)

Yep, that's right!.... "I'm Still NUTS"!!!.... I had wanted it to be the perfect shaker card for my wonderful husband of more than 30 years!... I almost cried before my sense of humor returned. It was too late anyway to turn back, as everything was glued to card front, and I was NOT starting over. So he ended up with a flawed shaker card, but that's OK, because he has a flawed wife!


As you can see, the "nuts" are the masculine equivalent of  'nuts & bolts'. I made them by first punching holes along a strip of cardstock, spaced apart enough to punch a hexagon around them (Stampin' Up punch). I inked distressed them all with black, as I had the center shaker nut, and popped up a couple for dimension.

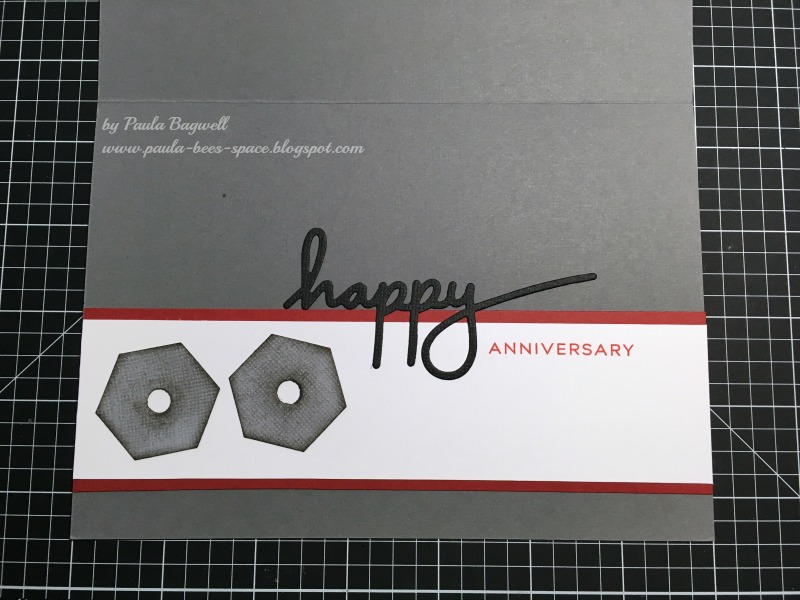
Next is the inside.... I made it to match the front of course, but I used a stamp & die set from Papertrey Ink called One Big Happy... 'happy' is die cut and 'anniversary' is stamped.


I put another 'nut' on the envelope. For some reason the envelope looks like it was bent in 1/2 at some point, but I assure you that it was not... it was flat!


I also shook the contents up on an angle for this pic, but no matter which way I got them to go, I could NOT uncover the entire sentiment all at the same time...

Lesson learned... don't fill shaker so full, LOL!!


Thanks for stopping.... and more thanks to those of you who didn't laugh :)


Tuesday, August 8, 2017

Anniversary Hearts


(click on photos to view larger image)


I wanted a lot of hearts for this anniversary card, so I started with embossing  the white front panel with a tiny hearts embossing folder. Then I matted an extra piece and added it on top. 


I used a heart punch to make the patterned hearts from CTMH Bella paper (retired)... and added a little bling to each one.

Now you just get a peek of the inside here:


But here's what the inside looks like.... I repeated the matted strip piece and added overlaying hearts. The sentiment is from Papertrey Ink's One Big Happy set... the "happy" is from a die in the set and the "anniversary" is stamped.


Here's a closeup of the inside hearts:


I punched out 2 more hearts from white cardstock and layered them under the top heart to give it a little more dimension.

I really love how it turned out and it was very easy to do.


Friday, July 28, 2017

His & Hers Towels Anniversary Card

A few days ago, I shared the 2 anniversary cards my sister & I made for each other's son (our nephew's) and their wives. Today I'm sharing the design we each made for our own son's & DIL's !!!

HIS & HER TOWELS

(click on photos to view larger image)


I'm only showing my card this time, because hers looked exactly the same... no color changes! 


I used white mulberry paper over white cardstock for texture on the towels. Wrapped twine around two brads to make the towel bar. The sentiment is from Papertrey Ink's One Big Happy set... the "happy" is from a die in the set and the "anniversary" is stamped.

A closer look at the towels:


The sentiment inside was done in MS Word.


That's all for now.... have a great evening! :)


Monday, July 24, 2017

Pair of Anniversary Cards for Cousins

My nephew's wedding was 364 days after my son's wedding (the cousins)..... which means their anniversaries are just a day apart each year! 

That's a benefit, cause every year now I make their cards at the same time. My sister joins me, and we each usually make the same 2 cards for our boys and their wives, just making sure we send them opposite so they don't end up with the same card design from us both!


(click on photo to view larger image)

For their past anniversaries, we made these cards with our daughter-in-laws in mind. We definitely made "girly cards, and we did them in their favorite colors.... pink (for my DIL) & purple (for her DIL). BUT these we sent opposite! My sister made and sent the pink one to her nephew (aka my son) and his wife, and I made the purple one for my nephew (aka her son) and his wife...... confused yet?

Anyway... the photo above shows both cards, but it doesn't do justice to all the glittery goodness down the right side of each. It's just plain hard to photograph glitter! A stencil was used on the white part of background and edge cut with a die. The focals are 3D decoupage layers. We added a few sequins, stamped "Happy Anniversary" on the inside and called it done!

Here's a pic of the card I made:


Well thanks for stopping by and putting up with my nonsense! :)


Sunday, May 15, 2016

My Favorite Bokeh


(click on photos to view larger images)

I'm not sure if it's the colors I used on this card, or if it's because the bokeh technique turned out better (I get more practice each time) or if it's a little of both.... but this turned out to be my fave bokeh anniversary card so far! This one was for our DD and her hubby's first anniversary. 


I used my favorite sprays... Lindy's Stamp Gang's Starbursts... for the background. I just love their shimmery goodness! I added water to move the colors around and blend a bit. After letting it dry overnight, I added the bokeh "bubbles" using homemade circle punched templates in different sizes (and a finger dauber for the smallest dots) with CTMH white daisy pigment ink. The panel was just a bit too large for the front of the card, so I used it's trimmings on the inside with the sentiment.


The ribbons are from CTMH and retired.... I layered them, added the bow and called it done! I was thrilled that she loved the card :)


Wednesday, April 20, 2016

Bokeh Anniversary


(click on photos to view larger images)

I made this anniversary bokeh card for my son and DIL. It was my second attempt with this technique. I used the same pink and orange Lindy's Stamp Gang Starburst Sprays as I did on the first card, and added the pops of a bright yellow spray. 


The photos do NOT do justice to showing the sparkly colors of these sprays. Each one has a glimmery two-tone effect. I love this brand! ..... As you can see, I'm still having some trouble with the stenciled white pigment ink "bubbles" to turn out in different depths of opaque-ness (my new word) that gives bokeh it's illusion of depth, but that didn't stop me from turning it into a card anyway! I let it dry before adding the white pigment circles and then dried again overnight before putting the card together.


This is a close-up of the chipboard heart trio I painted white with pearl paint... and pink flowers with yellow pearl centers (YES, they really are yellow!)


I had to trim the original bokeh piece down to fit on the front of the card, so I added those trimmings to the inside. Stamped my sentiment and called it done!

Thanks for stopping by to visit. Please come again :)

Supply List:
3 colors of Lindy's Stamp Gang's Starburst Sprays
CTMH White Daisy pigment ink
CTMH pearl paint
chipboard heart trio from Glitterdust Designs
yellow adhesive pearls from my stash
sentiment stamped in CTMH Cotton Candy with a wood stamp from ???


Thursday, April 14, 2016

Recycled Anniversary!


This is an anniversary card I made for my hubby. The glossy center is a repurposed piece from a stash my mother had in a small box we found in her closet. I do not know where it came from, but she had obviously cut it off of some sort of a calendar because there is a partial yearly calendar printed on the backside. 

Can you see in the shiny part how it looks like brushstrokes? Well, it looks like a little "painting" to me! She had cut out and saved several of these little "paintings" in all sorts of designs! I wish I knew why she had saved them, (sigh) oh well... 

As you can see, I matted it and then attached the whole panel to a card base. Wrapped baker's twine around it a few times and tied on the metal sentiment tag. With all those hearts, it really shows how much I still love my sweetie-poo-pie after all these years and he liked it... red is his fave color, so it worked out well, LOL!! :)

I'll have a few more recycled cards to show you in the coming days, so I hope you'll come back by here soon.

Have a great day!


Saturday, April 9, 2016

My First Attempt at Bokeh


(click on photos to view larger images)

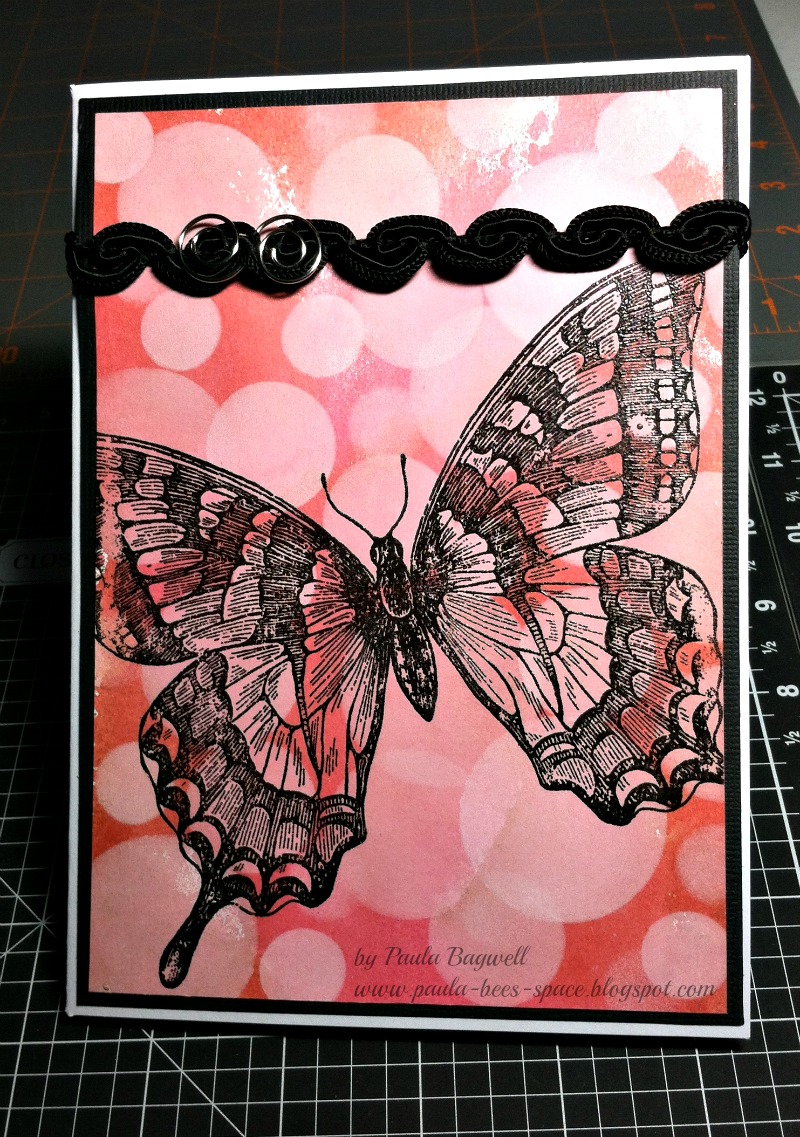
For my first attempt at the bokeh technique, I made an anniversary card for my BFF and her hubby in their favorite colors. (Don't ask me why his fave is black, because I don't know, LOL!)


I started with 2 Lindy's Stamp Gang's Starburst Sprays in a pink and an orange color. The photos do not show all the shimmery goodness of these two-toned shimmer sprays that I love so much!..... anyway... I let that totally dry before stenciling the circles in a white pigment ink, trying to make a variety in both size and opaque-ness.. (a new word, LOL!) of the circles.... I will definitely need more practice with that!!


After letting it dry overnight, I stamped the swallowtail butterfly in Versamark and heat-embossed it with a super-fine black EP.


I matted the bokeh panel on black cardstock, added some fancy black upholstery braid across the top and accented it with a silver metal swirl. 
Then added the entire thing to the card front with super strong Scor Tape.


Sentiment is stamped on the inside along with a second-generation image of the swallowtail... (I should have done 3rd generation, aka stamped-off twice, before stamping the card...hindsight is 20/20!)


I'll need more practice with this bokeh technique, but I do think it's so pretty. Thanks for coming to take a look :)


Supply List:
Stampin' Up Swallowtail Butterfly stamp
Lindy's Stamp Gang's Starburst Sprays - 2 colors
CTMH White Daisy pigment ink
CTMH ink - Cotton Candy
Versamark
super-fine black embossing powder
Scor Tape
braid trim and silver metal swirl from stash
sentiment stamp ??? 

Thursday, March 24, 2016

Heart Flourish Cards

Just some anniversary cards I made using the heart flourish from Impression Obsession:


Also used Got paper flowers and Martha Stewart lace border punch. Thanks for stopping by :)

Saturday, November 22, 2014

Masculine Anniversary Card


This is the card I made my hubby for our anniversary. It's quite large.... the Kraft cardstock base is a full 
8.5" x 11" piece, folded in half.... so finished size is 
5.5" wide x 8.5" tall.

I created the poster-type front in MS Word, using 12 different fonts. And I picked all different colors for both the backgrounds and fonts in each section.... making for a quite colorful card!

When I finally had it all arranged the way I wanted, I printed it out on white cardstock and cut it out, leaving a small white border all around as a faux mat.

Hope you like it.... my hubby did! :)

Thanks for stopping by.


Thursday, November 13, 2014

Triple-Time Embossed Anniversary Card


I made this card for my BFF's anniversary last month. Instead of triple-time stamping, I wanted to emboss. I used Decadent Roses EF from Crafter's Companion. Each white, embossed layer is matted on to black cardstock. I think it helps to make the center focal "pop"!!

The center focal is completely glittered... except for the black vinyl sticker outline. It's hard to see all the glittery goodness in that photo, so I laid the card flat to see if I could capture the sparkle better.


After the glitter was applied, I then colored and shaded each section with Spectrum Noir alcohol ink pens. This was my first attempt at coloring over burnished glitter, but I think it turned out well.

Here's an even closer look at the center focal:


(click on photos to view enlarged photo)


I hope you like it, too. Thanks for stopping by today :)


Thursday, October 9, 2014

Another Anniversary Card

My nephew and his wife got married the day after my son's wedding, although it was a year later. I made this anniversary card for them:


This card is in CTMH White Daisy cardstock, so please forgive the photos... I got them slightly off in color, didn't I? Too many shadows, LOL, gave them a yellow tinge!

Anyway... the background of the focal area I made with Lindy's Stamp Gang's Starburst Spray, by spraying and then smearing it across the white cardstock with a scrap piece. I love these two-toned color sprays that sparkle, but you can not tell in the photo above just how sparkly the blues are. It even looks like a 3-tone color! 

Tried as I might, I could not get the camera to pick up all the sparkled areas of the card at the same time.... so frustrating! So I laid the card flat and tried that direction:


Now in this second photo, you can see SOME of the sparkle! And if you compare it to the one above, those sparkle areas are what looked like the third, really dark blue in that first photo.

Finally, I did a close-up and was rewarded with it picking up still more of the sparkle.... just not all of it... so I gave up, LOL!... I think you can get a pretty good idea from this one. All of the really dark blues in the photo are actually the bright sparkly blue you can see below at the top of the card:


Anyway.... I then stamped my silhouette image from Stampin' Up in Versamark, and heat-embossed it with fine white embossing powder.

I used Spellbinders Deckled Rectangle die to cut and emboss frame in another piece of cardstock. It's raised slightly above image with dimensional tape to give it some depth. Then the entire panel is also raised above the card base with same dimensional tape.

Thanks again for coming to look at my card. :)


Saturday, September 20, 2014

Large Anniversary Card

Today I wanted to share an anniversary card I made for my son and his wife:

(click on photo to view larger image)


This is a larger card. I used a full 8-1/2 x 11 sheet folded in half, making the finished size 8.5" x 5.5". I used one of my favorite engagement photos of them and printed it out in Sepia. 

I made the card with CTMH cardstock in Colonial White, with the photo mat in Creme Brulee, along with Desert Sand ink.  Using a sponge, I distressed the edges and the raised embossed area with the ink before attaching it to the card base. 
The embossed panel is slightly raised with dimensional tape.

The lace-edged burlap is from a shop on Etsy. I just absolutely love it! 

(I also used a wider version of it on the Guest Book album I made for our daughter's wedding. You can see the album here, in case you missed it)

Finishing touches: a metal heart I've had for so long, I don't remember where I got it! Little punched hearts, embossed & inked, and 21 pearls from CTMH (Mocha Opaques)!

I hope you like the card and thanks for coming to my blog today! :)


Sunday, November 3, 2013

Fancy Anniversary Card


I wanted to share an anniversary card I made for my best friend and her hubby. I really do like how it turned out! It is totally a 'case' card... 
I saw the original one here.   

You can click on the photos to see
them larger for more detail.
front view

I ran the die through my Cuttlebug to cut both the card base and the patterned paper separately. Then I slightly offset the patterned paper to show the CTMH Colonial White cardstock below. Not only can you see the scalloped edge of the cardstock, but you can also see it behind the lattice work. I also popped the patterned paper up slightly to create more definition between the layers, and finished it off with floral arrangements and some Liquid Pearls at the lattice intersections! 


open view
I made the inside very simple, but it does match! I covered the inside with the same patterned paper. For the sentiment, I layered the patterned paper on a dark purple cardstock mat, and then attached the sentiment on top to make it stand out. 


Here are a couple of close-up views:
close-up of top left

close-up of bottom right

The flowers and leaves are all from I Am Roses. I hand-painted the small "open" dark purple roses (not the buds) with magical mica's from Lindy's Stamp Gang.... LOVE that stuff!!.... The roses were white before I painted them. You can see how they sparkle when looking at the full-size image 
(click on photo), but the photos don't even do them justice. They are more 'sparkly' in person! 


view to show the dimension of the paper layers... 
see how the patterned paper is raised up slightly
above the Colonial White cardstock?

I used a bunch, and I mean a whole bunch, of tiny, 1/16" thick pop-up squares between the paper layers for just a little dimension. I didn't want to raise it up too much. You can see just the first row of them down the right flap edge in the photo above. Each front panel has them all around the edges, as well as holding up the centers of each panel. It required so many of them to stabilize the lattice area, since none could be put between the layers there without showing.


One final look... I hope you liked this card, too!
Thanks for stopping by today :)


Supplies:

Paper - Hot Off the Press
Cardstock - Bazzill and CTMH
Die - Joy Craft
Flowers/Leaves - I Am Roses
Liquid Pearls
Lindy's Stamp Gang Magical Mica's
Scor-Tape
Other: MS Word; hot glue; dimensional pop-up squares


Related Posts Plugin for WordPress, Blogger...