Showing posts with label CTMH Paper: Floral Impressions. Show all posts

Friday, July 27, 2012

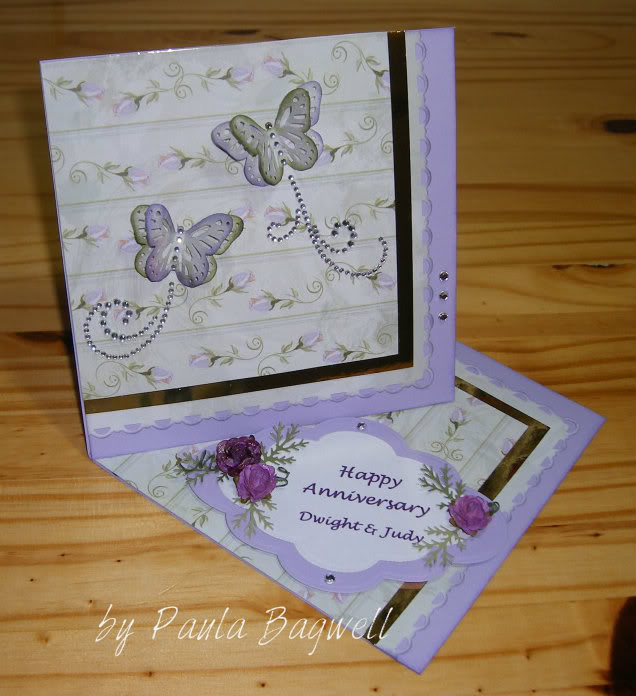
Last Floral Impressions Twisted-Easel Anniversary Card

Well... here is the last of this year's anniversary easel cards! Another "twisted" one! I'm finally done with the Floral Impressions paper pack... yeah!


I don't have anymore anniversary cards to do for this year
(my fiscal Oct-Sept!)

Now I can concentrate on making 2 wedding cards... one I need for next Wednesday... yikes!... and the other for our son's wedding on Sept 8th! Better get myself in gear, and get a move on! My hospital stay put me behind a bit!

Then it will be back to anniversary cards in October with a "new" paper pack and card design... wonder what I'll decide to do? But I'll have to put those decisions off until after the wedding!

Just a side note... with all this wedding stuff going on, and my recuperation, and our first grandchild due in three weeks, and life in general, etc, etc....
I probably won't be able to do many blog posts, if any at all... but I'll do my best to get back asap to my 10 "posts" per month schedule I had decided
to do!

Wednesday, July 25, 2012

Sympathy Card

Some sad news for today...

My sister's best friend, Kathy, lost her battle with cancer on July 13th.
They were friends for 40 years!

I actually introduced them back in 1972! We were teenagers then, and had just moved to Dallas at the time. There were lots of kids living in the apartments we moved into, and I had met Kathy's younger sister first. Anyway.... I was in the hospital when she died, so I have just now finished the sympathy card for my dear sister.


I have been making anniversary cards with the retired CTMH paper set
Floral Impressions, and it seemed perfect for the sympathy card as well, since Kathy's favorite color was purple. I also decided to make it a
twisted-easel card. I hope my sister likes it, even though it's very late.
She was up at the hospital with me every day, despite her personal grief.... so I know she'll understand why it's late.


It's just so sad to lose a loved one.
Thanks for letting me share this with you all.


Sunday, June 24, 2012

More Anniversary Easel Cards

Here's a few more of my Floral Impressions Anniversary Easel and
Twisted-Easel Cards that I'm making this year:

Grey Flannel base with the old Level 1 Kit matted on mirricard


Mirricard mats on Amethyst base


Level 1 Kit matted on Amethyst then put on Grey Flannel base

Mirricard mats on Olive base and ribbon inked in Gypsy


Floral Impressions is a retired CTMH paper pack, that coordinates with the CTMH colors of Amethyst, Olive, and Gray Flannel cardstock. Shiny mirricard is also used as mats on most of the cards. I used Magical Micas from Lindy's Stamp Gang to paint the flowers as always!

For more info on these, please see my other easel card posts both here
and here.


Wednesday, May 30, 2012

Anniversary Twisted-Easel Cards

Well, a little over a week ago, I promised to post some of my
Twisted-Easel Anniversary Cards. (To see the post with the regular easel anniversary cards, click here.)

Since we're still in my fiscal year according to anniversary cards
(Oct2011-Sept2012), lol, these cards are still 6x6 and done in
CTMH paper Floral Impressions (retired).


Amethyst base with GOLD mirricard, double-layer butterflies
inked in Gypsy on Olve and reversed to Olive on Gypsy

Olive base with GOLD mirricard and the same butterflies,
a different patterened paper from same set

This one is 'twisted' in the opposite direction.
This is the closeup of the top portion
and this is the closeup of the sentiment --- you can see the shadow
from the loops of the paper lace down on the sentiment...
the flash caused the mirricard to shine down, but not through the paper!
(all flowers are from I Am Roses and painted with
and the final card for today!

So that's it for now.... as you can see I made 3 of the 4 very similiar, with just a few differences like the placement of the bling, etc.

Sunday, May 20, 2012

Anniversary Easel Cards

If you don't know it already, I'm a little OCD! I can't seem to change the type of anniversary cards that I make except on a yearly basis! And "my" year doesn't start in January either! It starts in October.

Why, you ask? Because that is when my BFF's anniversary is (and my sister's was, as well, but not anymore), so I start with them! So then everybody else I know, gets a card with something of the same theme...
like last year - Oct2010 to Sept2011 - everybody got cards made with the CTMH Miracle paper (retired), but I didn't take any photos of them. :(

This year (Oct2011 thru this coming Sept) I started by making both of them Double-Twisted Easel Cards. If you'd like to see those cards, check them out here and here.  

So this year, everybody is getting an easel card whether it's a regular easel, a twisted-easel, or a double easel. And all, except those first 2 double-easel cards, will be 6x6 and done with CTMH Floral Impressions paper (retired)! I've posted a few of them below:

grey flannel base and olive mat with double amethyst layered butterflies

olive base with gold mirricard mats and double-layered butterflies

This next one has the same olive and gold,
and the butterflies are still 2 layers but inked with olive
on gypsy and the other as gypsy on olive!


These 3 are the same - olive base with gold mirricard with
the opposite inked 2 layer butterflies. The center
card just has a different greeting shape and configuration.

I also decided to do a wedding card as 5x7 easel:
This one has amethyst as the base and silver mirricard mats.


This final one here is done on an amethyst base as well,
but has purple mirricard mats!


I'm loving this Mirricard! If you click on the photos to see them bigger, you can see how really "mirror-like" it is by the reflections you can see.
It is so pretty!

The flowers are painted with Lindy's Stamp Gang Magical Micas, just like the posts of the double-twisted easel cards I mentioned above.

I'll post some 6x6 twisted-easels soon, so come back and check them out!
Thanks for stopping by today! I'm glad you came :)


Monday, September 5, 2011

Tutorial - a Square-Triangle Tri-Fold Card.... (an oxymoron??)

A square-triangle? "Isn't that an oxymoron?" you ask.
NO!.... not when we're talking about the Square-Triangle Tri-Fold card!
I even put a diamond on top...


This is my first tutorial, so I hope you like it. It's really pretty easy
to do. (You can click on each photo to enlarge it.)

For this particular card, I'm using the retired paper pack - Floral
Impressions - and cardstock in Amethyst, Olive, Grey Flannel and
White Daisy.

Now, on with the tutorial....

The Card Base:
The finished card must be a perfect square. For this tutorial, we'll be
making a 6x6 card. The card base needs to be three (3) times as
long as it is high, so we'll need to start with a piece of cardstock that
is 6" x 18"...

To achieve this, an entire 12x12 piece of cardstock is needed for the
base. Take cardstock and cut it in half, then score each half at the
6" mark..... like this:


Using a very strong adhesive (I used Provo Craft's Terrifically Tacky
Tape), glue one 6x6 section of one of the pieces to a 6x6 section of
the other piece, to end up with this:


Now score both outside sections diagonally in the same direction:
(I used my cutter and the embossing stylus to score)

(I just bent these scored marks to be able to see them better)


Now fold the scored 'triangles' like this:

(Oops! The card base in this photo is upside-down ---
I had just turned it over to use the bone folder
to crisp the folds.... sorry... turn it back over to continue!)

Then fold each side in, like this:


Use bone folder to crisp folds. The finished card base will look like this:


Make Your Focals:
The base of your 2 focals need to be exactly the same. You can make
them anything you like. I used my Cuttlebug and diamond-shaped
Nestabilities to create mine.

(you can see my focal bases 2 photos down!)


Time to put card together: 
Now cut 2 squares out of chosen patterned paper - one 5-1/2" x 5-1/2"
and one 5-5/8" x 5-5/8". (I cut my 5-1/2" square from the matching
Level 1 Kit I had - also retired, and the 5-5/8" square from the B&T
paper that matched from the Level 2 PP.)

Then cut the 5-5/8" square piece diagonally to form 2 triangles. Ink
all the edges of papers and card base if desired. Adhere to the triangle
sections of the card base. Next, adhere the 5-1/2" square in the
center of card base, as shown:

(see my focals now?... just not decorated yet!)

Now it's time to finish decorating the 2 focals, so we can add them to
the card! My sentiments are just printed in Word on my computer,
and popped-up with very thin (1/16th" thick) double-sided pop-up
foam dots for a little extra dimension. I edged the top diamond with
Lavender Flower Soft!

For the card to open and focals to be in the right direction, it's much
easier to close the right side of card first. Add middle focal by one
edge unto the folded triangle, leaving the bottom left side of focal
loose, like so:


(This is what it looks like open, after attaching the focal... see how the
focal is sideways? Very easy to get it glued down in the wrong
direction, if you don't close the side in first!)

Now close the left triangle over top of the middle focal. Attach front
focal piece. Only glue bottom left edge unto the triangle and make
sure that it's completely lined up over that middle focal, like this:


Now open it all up, and finish the center square.

I used Word again for my inside sentiment (not shown here), and
printed it out on cardstock. I cut it smaller, leaving enough space
on it for our signatures, and attached it on the
center square in the middle. Signed it, and...
Viola! All done!


Related Posts Plugin for WordPress, Blogger...