Showing posts with label BLING. Show all posts

Saturday, December 15, 2012

DIY Bling Flourishes!

Save a ton of money and make your own bling flourishes!

In this video tutorial by Stacy, she shows just how easy these are to make... you just need a few items... a needle, your printer, some rhinestones, Helmar Gemstone glue, and a little time! And if you can
free-hand your flourish drawing, you don't even need a computer printer!

Watch on YouTube: HERE


Tuesday, August 7, 2012

Engaged!.... (long post with many pictures!)

Our son is getting married on September 8th! Last Tuesday eve, they surprised us with some engagement photos, and this is one of them:

(I added the text)


They had come up for a wedding of friends, the next day, and I had been working on the wedding card for them to take to the happy couple (another Floral Impressions Easel Card!) I wasn't done with making the 3D envelope box it had to go in, so Michelle got to see the card up close and personal! Now, she and her women folk are all "crafty" women (just not in scrapbooking or cardmaking.) 

So, I was very flattered at her attention to and comments about the card.... so much so, that I decided to make her an even more elaborate one... one with a different engagement photo that she mentioned was one of her favorites. I made it so they could use it as a photo decor item in their home (or just throw it out if they didn't like it, lol)

Michelle's sister and SIL gave her a bridal brunch for her shower on Saturday. With my health, I wasn't sure I'd make it since it's more than 2 hours away, but I did. YAY! It was a fun and happy event! There were over 30 women attending, and she received many nice gifts for their new home together.
I had my real gift shipped ahead just in case I didn't make it, so I ended up taking her the photo decor and a card, that turned into a kind of mini-album.

Here's the photo of the decor piece I made:


click to see photo larger

Michelle's wedding colors are pastels... a pink-azalea color, yellow and a touch of purple. Her favorite flowers are daisies, which will be her bouquet. Her bridesmaid's will be in the pink tones and the wedding cake will be chocolate with yellow icing and daisies flowing all over the top and sides, gradually thinning out as they get to the bottom layer. With all that in mind....


That's why I did the easel part of the project in yellow (some Basic Grey color I don't remember). I triple matted the photo, first on white cardstock embossed with an ivy pattern, then on a patterned paper from my stash that I thought complimented the pattern in her dress, and then on
Gold Mirricard from Marco's. The sentiment's I did in MS Word, and matted them on CTMH Cotton Candy cardstock.

There are 2 sizes of daisies on here.... the smaller ones, as well as the small pink roses, yellow cherry blossoms, and the leaves are from I Am Roses.
All the smaller flowers were white to start with, but I painted them with
Lindy's Stamp Gang's Starburst Spray in Cotton Candy Pink and I used their Yellow Rose of Texas Magical Micas... that's in their Prairie Wildflowers set.


The base is 7.25" x 12" and built on chipboard for extra sturdiness. The bottom patterned paper is of small yellow daisies on a white background and the whole paper had a golden shimmer to it. (You'll be able to see it better in the photo of the matching card.) The next layer is the Gold Mirricard again, and then topped with daisy patterned paper from my stash that is so old, I don't even remember the store I purchased it from, lol :)! But it's made from a real photo of a field of daisies, and it really made exactly the look I was going for! I love when that happens!

The 3 large daisies on the project I made myself! I'm so proud of these as they're my first attempt at daisies!.... I started each with 2 paper flowers from CTMH. I had to hand-cut all the niches in each petal of every layer, to get them to resemble the other daisies. I glued the 2 paper flowers together, with petals slightly off-set, making a daisy. In the center of each, I put a CTMH clear button, then covered each button with a custom two-color yellow flower soft to get the "fuzzy" look I wanted. I liked how they turned out so much, that I covered the centers of the I Am Roses daisies with the flower soft as well. I finished it off with some butterflies (punch from Martha Stewart) in CTMH Floral Impressions paper (retired), inked with CTMH Gypsy ink, to get the bit of purple added in, and topped them off with some bling swirls marking their "flight" pattern, and CTMH Bitty Sparkles for their bodies! 

I also made a matching 3D box to hold both this easel project and the card.
Since it had to be longer than 12", I covered the seam with the daisy paper.


And I knew way ahead of time, that I was going to make a card "booklet" (or mini album) for Michelle, because of the things I wanted to include in it. So, I matched the card to this elaborate easel decor piece I had made!


This is the card front with all I Am Roses embellishments. You can see the yellow daisy paper better here, but still not the gold shimmer it had... you had to hold it at an angle to see the shimmer! Same Basic Grey yellow cardstock as the easel, and all the inside 'pages' are CTMH Cotton Candy cardstock.

The inside pages are as follows:


This is a poem I wrote for Michelle to welcome her to our family!
(sorry the photo is a little blurry)

These pages are the "Recipes"!
Left one I wrote for a happy marriage and right one
to add to the recipe book she received!
It's a recipe for Chocolate Peanut Butter Oatmeal NO-Bake Cookies!

Just a crazy personal note to her!
And because I had the gift sent to her home,
the last paragraph tells her to turn the page
to see her gift that should arrive soon.
(but she got it the day before! Go figure!)


It's a PINK KitchenAid Mixer with a flexible edge attachment
(see the small photo on the left)

I made this photo collage on PicMonkey's free online photo editing site. The images are all from Google Images... top one says "Bridal Shower" on the umbrella, second one is gold wedding bands, 3rd is the flexible edge attachment, and the bottom one is the wedding cake Michelle wants (from Martha Stewart Weddings).

Can you tell her favorite color is pink?

Well this post is finally done!... I told you it was long and had lots of pictures in the title, so if you made it all the way down here, thank you so much for taking your precious time to check out my blog post! :)

Have a GREAT day!


Friday, July 27, 2012

Last Floral Impressions Twisted-Easel Anniversary Card

Well... here is the last of this year's anniversary easel cards! Another "twisted" one! I'm finally done with the Floral Impressions paper pack... yeah!


I don't have anymore anniversary cards to do for this year
(my fiscal Oct-Sept!)

Now I can concentrate on making 2 wedding cards... one I need for next Wednesday... yikes!... and the other for our son's wedding on Sept 8th! Better get myself in gear, and get a move on! My hospital stay put me behind a bit!

Then it will be back to anniversary cards in October with a "new" paper pack and card design... wonder what I'll decide to do? But I'll have to put those decisions off until after the wedding!

Just a side note... with all this wedding stuff going on, and my recuperation, and our first grandchild due in three weeks, and life in general, etc, etc....
I probably won't be able to do many blog posts, if any at all... but I'll do my best to get back asap to my 10 "posts" per month schedule I had decided
to do!

Wednesday, July 25, 2012

Sympathy Card

Some sad news for today...

My sister's best friend, Kathy, lost her battle with cancer on July 13th.
They were friends for 40 years!

I actually introduced them back in 1972! We were teenagers then, and had just moved to Dallas at the time. There were lots of kids living in the apartments we moved into, and I had met Kathy's younger sister first. Anyway.... I was in the hospital when she died, so I have just now finished the sympathy card for my dear sister.


I have been making anniversary cards with the retired CTMH paper set
Floral Impressions, and it seemed perfect for the sympathy card as well, since Kathy's favorite color was purple. I also decided to make it a
twisted-easel card. I hope my sister likes it, even though it's very late.
She was up at the hospital with me every day, despite her personal grief.... so I know she'll understand why it's late.


It's just so sad to lose a loved one.
Thanks for letting me share this with you all.


Sunday, June 24, 2012

More Anniversary Easel Cards

Here's a few more of my Floral Impressions Anniversary Easel and
Twisted-Easel Cards that I'm making this year:

Grey Flannel base with the old Level 1 Kit matted on mirricard


Mirricard mats on Amethyst base


Level 1 Kit matted on Amethyst then put on Grey Flannel base

Mirricard mats on Olive base and ribbon inked in Gypsy


Floral Impressions is a retired CTMH paper pack, that coordinates with the CTMH colors of Amethyst, Olive, and Gray Flannel cardstock. Shiny mirricard is also used as mats on most of the cards. I used Magical Micas from Lindy's Stamp Gang to paint the flowers as always!

For more info on these, please see my other easel card posts both here
and here.


Wednesday, May 30, 2012

Anniversary Twisted-Easel Cards

Well, a little over a week ago, I promised to post some of my
Twisted-Easel Anniversary Cards. (To see the post with the regular easel anniversary cards, click here.)

Since we're still in my fiscal year according to anniversary cards
(Oct2011-Sept2012), lol, these cards are still 6x6 and done in
CTMH paper Floral Impressions (retired).


Amethyst base with GOLD mirricard, double-layer butterflies
inked in Gypsy on Olve and reversed to Olive on Gypsy

Olive base with GOLD mirricard and the same butterflies,
a different patterened paper from same set

This one is 'twisted' in the opposite direction.
This is the closeup of the top portion
and this is the closeup of the sentiment --- you can see the shadow
from the loops of the paper lace down on the sentiment...
the flash caused the mirricard to shine down, but not through the paper!
(all flowers are from I Am Roses and painted with
and the final card for today!

So that's it for now.... as you can see I made 3 of the 4 very similiar, with just a few differences like the placement of the bling, etc.

Sunday, May 20, 2012

Anniversary Easel Cards

If you don't know it already, I'm a little OCD! I can't seem to change the type of anniversary cards that I make except on a yearly basis! And "my" year doesn't start in January either! It starts in October.

Why, you ask? Because that is when my BFF's anniversary is (and my sister's was, as well, but not anymore), so I start with them! So then everybody else I know, gets a card with something of the same theme...
like last year - Oct2010 to Sept2011 - everybody got cards made with the CTMH Miracle paper (retired), but I didn't take any photos of them. :(

This year (Oct2011 thru this coming Sept) I started by making both of them Double-Twisted Easel Cards. If you'd like to see those cards, check them out here and here.  

So this year, everybody is getting an easel card whether it's a regular easel, a twisted-easel, or a double easel. And all, except those first 2 double-easel cards, will be 6x6 and done with CTMH Floral Impressions paper (retired)! I've posted a few of them below:

grey flannel base and olive mat with double amethyst layered butterflies

olive base with gold mirricard mats and double-layered butterflies

This next one has the same olive and gold,
and the butterflies are still 2 layers but inked with olive
on gypsy and the other as gypsy on olive!


These 3 are the same - olive base with gold mirricard with
the opposite inked 2 layer butterflies. The center
card just has a different greeting shape and configuration.

I also decided to do a wedding card as 5x7 easel:
This one has amethyst as the base and silver mirricard mats.


This final one here is done on an amethyst base as well,
but has purple mirricard mats!


I'm loving this Mirricard! If you click on the photos to see them bigger, you can see how really "mirror-like" it is by the reflections you can see.
It is so pretty!

The flowers are painted with Lindy's Stamp Gang Magical Micas, just like the posts of the double-twisted easel cards I mentioned above.

I'll post some 6x6 twisted-easels soon, so come back and check them out!
Thanks for stopping by today! I'm glad you came :)


Sunday, October 23, 2011

Double-Twisted Easel Card 2!

Well here is the second Double-Twisted Easel Card I've made this month for an Anniversary! (Actually this is only the second one I've ever made... see the first one here) This time it's for my sister and her hubby, and I'm entering it into my very FIRST challenges ever! 

The challenges are:
Beary Sweet Scrap Challenge #36 - Double or Nothing - 2 easels
Totally Papercrafts Friday Challenges #89 - Layer upon Layer  - for multiple layers!


Green is my sister's fav color and since my bro-in-law likes the Denver Broncos, I figured he might like blue! But instead of doing a "his & hers" theme by sides like the first one, I decided to combine the colors together.

I made this the same way... still a 6" x 12"... (except for a few things which I will explain in this post).... if you're curious as to what I did, check out the first one for a more thorough explanation, as I'm not going to go into it all again in this post.

The first thing that is different, is that I did have to "build" this one on a thin piece of chipboard for the needed strength to hold the weight. I did not acheive the same sturdiness as the first with just layers of cardstock, because on this one, the shiny mats around the base and easel panels are just very thin paper instead of heavy cardstock!

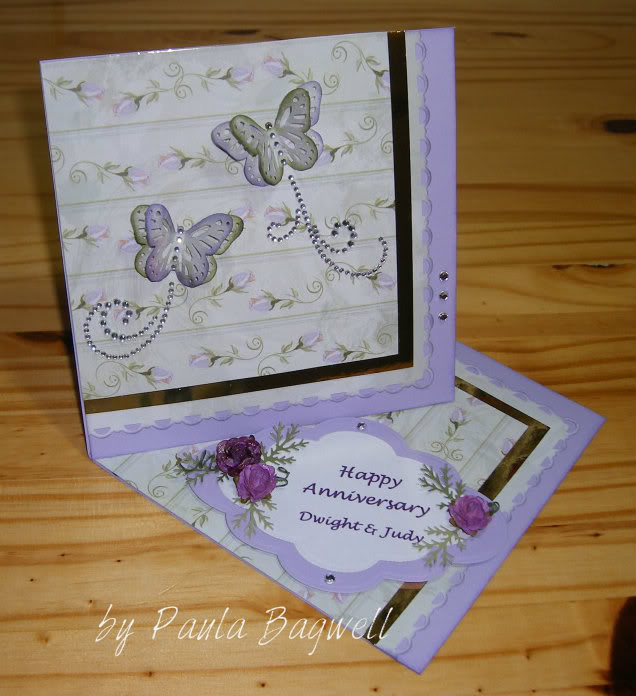
Next photos are the close-ups of each side:

left side

right side


Now the center sentiment all decorated with painted mulberry flowers (they were originally white) from I Am Roses:

Click on photo to view LARGER and see all the "sparkling" roses!

For these roses, I also used Lindy's Stamp Gang products... are you surprised at all by this? LOL! I "painted" the colors on just like before (again see the first double-twisted easel card post if curious!)

Products from LSG that I used for these roses are:
Starburst Sprays - Afternoon Delight Denim and Hydrangea Blue
Glitz Spritz  - Scintillating Silver


Here are some close-up shots of the roses and butterfly embellishments:

Lace border and Leaf punches from Martha Stewart
Rose done in Afternoon Delight Denim Starburst Spray topped with
Scintillating Silver Glitz Spritz from LSG


I had to 'color' the flower that is part of the sticker to match since it was pink!
I used CTMH markers to change the colors!
Rose done in Hydrangea Blue Starburst Spray, again topped
with Scintillating Silver Glitz Spritz


Check out the "sparkle" on this darker rose... AWESOME!
Butterfly punch is also Martha Stewart.


Bling used for bodies are from the Green/Blue assortment from CTMH


List of supplies:
Basic Grey Two Scoops paper pack with stickers
Bazzill cardstock - Guacamole
Metallic Foil paper by Hygloss
CTMH cardstock - White Daisy (for lace border)
CTMH markers - Outdoor Denim and Crystal Blue
CTMH Sparkles (clear) and Sparkles Green/Blue Assortment
Scor Tape
Herma Dotto
Spellbinders Nestabilties Labels #6 Dies
Martha Stewart Punches - Lace border, Butterfly and Leaf
Lindy's Stamp Gang Starburst and Glitz Spritz Sprays (as described in post)
I Am Roses - 3 sizes of white mulberry roses
Rhinestone Flourishes (from my stash - don't remember manufacturer)
Pop-Dots for dimension of sentiment
Chipboard
MS Word computer Font


Saturday, October 22, 2011

Double-Twisted Easel Card

This is the first of two Double-Twisted Easel cards I've ever made!
I combined two video tutorials (I have saved here on my blog....
Twisted Easel Card and Ouad-Easel Card), and came up with this 6"x12" card!

These types of cards are demensional, not only when standing the easel up, but also when closed. Due to the "must have" bumped-up element that is attached to the bottom layer, which is needed for the easel to rest against when standing, a regular envelope is not always workable. A demensional Envelope Box is required in some cases. This particular card is especially deep when closed because of the roses.... almost an inch!

I think it turned out fairly well, except since it was 12" long, I couldn't make my own envelope box for it anyway, so I had to wrap it in tissue instead! LOL! :)


I made this in pink and black (their favorite colors) for my BFF and her hubby for their 36th Anniversary earlier this month... kind of a "His & Hers" thing. The lace borders were made with the Martha Stewart punch.

(Just a side note .... Remember, to see any photos LARGER,
just click on them as usual.)

Here's a close-up of the left side (Pink - Hers). On this side, I used paper from Basic Grey's Two Scoops set (I had this set in my stash):


This photo shows the easel back


And here is a close-up of the right side (Black - His). On this side, I used paper from CTMH Sweetheart set (the black polka-dotted paper -
now retired) and the "Love" sticker is from Basic Grey's Two Scoops:


This photo is also the easel's backside

I also used CTMH cardstock colors in Black, White Daisy and Olive and Bazzill cardstock in Chloe. The card base, as well as the easel panels, have a black & silver FOIL cardstock mat from Paper Pizazz. To make a really strong base and easels, I wanted to use several cardstock layers to hold the weight. I also used strong Scor Tape to keep it all together.

I just used Herma Dotto tape on the top patterned papers. The center sentiment was printed in MS Word and was cut on my Cuttlebug with Spellbinders Nestabilties
Labels #6 dies, matted together and then popped up with dimensional pop-dots.
Here's a close-up of the center sentiment... see how the easels rest against it's edges on the back side?

Roses are painted with products from

Make sure you click on the photo above to see those awesome roses up close! Look how they sparkle... and the photo doesn't even do them justice!

I just LOVE the way these white mulberry roses (in 3 sizes) from
I Am Roses  turned out! I used Starburst Sprays, in Midnight Rendesvous Raven and Pretty in the Pink Pink, Glitz Spritz in Scintillating Silver (for more colors, just type in "glitz" in their search bar), and Magical Micas in Cotton Candy Pink, all from Lindy's Stamp Gang to paint them..... yes, I said PAINT.

I used a waterbrush, from a set from the same company, to paint the Magical Mica powder on the petals... just made a small nickel-sized puddle
of water on my Ranger non-stick craft sheet, then dipped the tip of
the damp brush into the mica powder pot to "grab" a little mica powder
and swirled it into my puddle of water. Mixed very well... then viola... paint!
And beautiful, sparkly paint at that!


Click on the photo below to see how the Cotton Candy Pink sparkles!
(Butterfly and Leaf punches from Martha Stewart)

It was so, so easy to do, that I decided to just spray the Starbursts colors on to my craft sheet, too! I added a little water from the waterbrush, mixed it up and painted the same way! With painting, I had much more control over exactly where the color went! And much LESS mess than if I had actually sprayed the flowers individually themselves, especially to cover all sides of each of the petals!

After the flowers had all dried, I found that the Cotton Candy Pink ones were much more "sparkly" than the other two colors, even though they did have some sparkle as well. That's the power of "Magical Micas"!... so I 'painted' the Scintillating Silver Glitz Spritz on the top of the petals in the same fashion. The Glitz Spritz's just give the glimmer and let the color shine through! The result was spectacular! I could not be more pleased with how they turned out. :)


See how this color just sparkles!


And remember... the sparkle is even better in person!

If you haven't tried these products yet, visit their online store and try them out. 

Anyway... back to the card... here's some final close-up pictures:


I punched two buterflies for each of the three on the card. To get the dimension, I just glued their bodies together with a Quickie Glue pen, and also only glued the body on to the paper. After completely drying, I was then able to lift the layers of wings up to make them seem as if they were in flight! CTMH Bitty Sparkles make up their tiny butterfly bodies, and I used some rhinestone flourishes from my stash (I think I got them eons ago at Walmart) for the fluttering trails!


Well... that's all for the FIRST Double-Twisted Easel Card! Whew!... never thought I'd get this all posted! I'll be posting the "second" one as soon as I can, because I'm entering it into a Blog Challenge.... read more about that in the next post!

You should be able to see the SECOND Double-Twisted Easel Card here. At least you will after I get it posted! LOL! If the link works then my work is done!

If not... stayed tuned!.......


Monday, August 29, 2011

Bling Storage Box


As I recall, this unfinished wood box was from KaiserCraft. I use it to store all of my
non-CTMH bling! (I have a drawer for CTMH bling! LOL!)

I used Mod Podge for Paper to glue on the paper from the Magnifique PP. This Mod
Podge wasn't as thick as the regular, so it dried faster, and the top sealer coat is not as
'tacky' as the other after drying!

While I covered the top and front with the peacock, I decided to used the striped paper
on the sides and back. I think I did a pretty good job matching up the peacock's tail
feathers down the front, even with the 'break' in the box where it opens!


Here's a better view of the top!
(click on photos to see larger image)

I added a few blue Sparkles to the peacock on the top and the word "bling" with bling 
on the front under the latch to give it a little more pizzazz!


Related Posts Plugin for WordPress, Blogger...