NO!.... not when we're talking about the Square-Triangle Tri-Fold card!
I even put a diamond on top...
This is my first tutorial, so I hope you like it. It's really pretty easy
to do. (You can click on each photo to enlarge it.)
For this particular card, I'm using the retired paper pack - Floral
Impressions - and cardstock in Amethyst, Olive, Grey Flannel and
White Daisy.
Now, on with the tutorial....
The Card Base:
The finished card must be a perfect square. For this tutorial, we'll be
making a 6x6 card. The card base needs to be three (3) times as
long as it is high, so we'll need to start with a piece of cardstock that
is 6" x 18"...
To achieve this, an entire 12x12 piece of cardstock is needed for the
base. Take cardstock and cut it in half, then score each half at the
6" mark..... like this:
Using a very strong adhesive (I used Provo Craft's Terrifically Tacky
Tape), glue one 6x6 section of one of the pieces to a 6x6 section of
the other piece, to end up with this:
Now score both outside sections diagonally in the same direction:
(I used my cutter and the embossing stylus to score)
(I just bent these scored marks to be able to see them better)
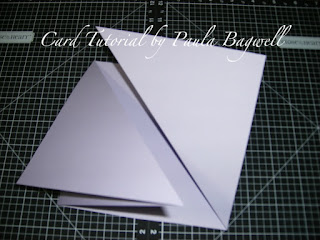
Now fold the scored 'triangles' like this:
(Oops! The card base in this photo is upside-down ---
I had just turned it over to use the bone folder
to crisp the folds.... sorry... turn it back over to continue!)
Then fold each side in, like this:
Use bone folder to crisp folds. The finished card base will look like this:
Make Your Focals:
The base of your 2 focals need to be exactly the same. You can make
them anything you like. I used my Cuttlebug and diamond-shaped
Nestabilities to create mine.
(you can see my focal bases 2 photos down!)
Time to put card together:
Now cut 2 squares out of chosen patterned paper - one 5-1/2" x 5-1/2"
and one 5-5/8" x 5-5/8". (I cut my 5-1/2" square from the matching
Level 1 Kit I had - also retired, and the 5-5/8" square from the B&T
paper that matched from the Level 2 PP.)
Then cut the 5-5/8" square piece diagonally to form 2 triangles. Ink
all the edges of papers and card base if desired. Adhere to the triangle
sections of the card base. Next, adhere the 5-1/2" square in the
center of card base, as shown:
paper that matched from the Level 2 PP.)
Then cut the 5-5/8" square piece diagonally to form 2 triangles. Ink
all the edges of papers and card base if desired. Adhere to the triangle
sections of the card base. Next, adhere the 5-1/2" square in the
center of card base, as shown:
(see my focals now?... just not decorated yet!)
Now it's time to finish decorating the 2 focals, so we can add them to
the card! My sentiments are just printed in Word on my computer,
and popped-up with very thin (1/16th" thick) double-sided pop-up foam dots for a little extra dimension. I edged the top diamond with
Lavender Flower Soft!
For the card to open and focals to be in the right direction, it's much
easier to close the right side of card first. Add middle focal by one
edge unto the folded triangle, leaving the bottom left side of focal
loose, like so:
(This is what it looks like open, after attaching the focal... see how the
focal is sideways? Very easy to get it glued down in the wrong
focal is sideways? Very easy to get it glued down in the wrong
direction, if you don't close the side in first!)
Now close the left triangle over top of the middle focal. Attach front
focal piece. Only glue bottom left edge unto the triangle and make
sure that it's completely lined up over that middle focal, like this:
Now open it all up, and finish the center square.
I used Word again for my inside sentiment (not shown here), and
printed it out on cardstock. I cut it smaller, leaving enough space
on it for our signatures, and attached it on the
center square in the middle. Signed it, and...
Viola! All done!


2 comments:
Thanks Scrappin Thread! Emailed you, and then deleted your comment to remove your email addy from showing to all... just in case you didn't really want it public :)
Post a Comment