Sunday, October 27, 2013

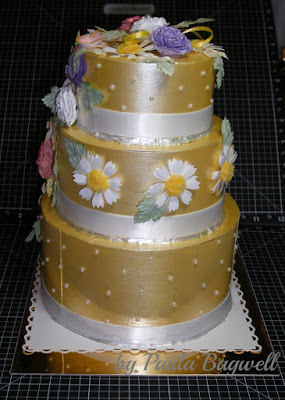
Wedding Cake Box for an Anniversary!


Well, I can't believe it, but I made another one..... the 


Wedding Cake Gift Card Holder Box!!

Only this time it was for an Anniversary... for our son and DIL. You can click on the photos to see the larger image. I have the instructions for one of these in the blog post of my first cake box... you can find it here. So I'm not going to print out all the instructions again! I'll try to point out the different things I did on this one, and any new instructions needed. 

Front View

On this cake, I covered the layers with CTMH cardstock in Sunkiss Yellow, but I did not emboss any of the "cake" layers. I decided to apply the cardstock with strong double-sided tape, instead of the wet glue I used on the first cake. I ended up having to use wet glue to get the ends to stay put anyway, so I recommend using a wet glue for entirely covering the boxes, as it gave me a much better permanent bond. 

And this time I tinted the pearl paint with the CTMH Sunkiss Yellow reinker before painting the layers, to keep the color from turning a lighter yellow. 

Left Side

Also the white satin ribbon is the real deal here, not paper 'ribbons'! I had to put the ribbon on in two layers, as the yellow pearl paint bled through the first ribbon layer where I had applied the glue. (Oh no!) But the top ribbon layer covered those spots very nicely! Whew... avoided disaster!

I did not use glitter to cover the hot-glue seams between the layers like I had done before. This time I went over them with Liquid Pearls in White Opal.

Back View

Instead of the 'spikey' flowers on the first cake, I chose daisies, as this is her favorite flower, and what their real wedding cake had all over it. 

I made each daisy by punching 2 flower layers and then snipping a "v" shape from the end of each petal (very time consuming, lol). I slightly rotated the 2 layers to offset the petals just a little bit. The center of each is actually a button... yes, buttons.... BUT they are covered with a 2-tone mix of Flower Soft that I blended myself. I love how they turned out with their fuzzy centers! 

I chose to arrange them not only throughout the cascade, but around the middle cake layer. That's why no embossing was needed on the middle layer, like I did on the first cake. And I used the Bitty Pearls on the top and bottom layers.


Right Side

The carnations and 'itty-bitty' flowers are made just like before... just color changes, with darker inked edges.... Amethyst CS with Gypsy inked edges and Blush CS with Cotton Candy inked edges on the carnations, and the 'itty-bitty's' and small carnations are done in White Daisy CS with Sunkiss Yellow inked edges. Some of the carnations are plain white and some of the 'itty-bitty's' are also sprayed with Glitz Spritz in Sunset Pink before adding the Liquid Pearl centers.

The leaves are different...... instead of hand cutting and inking them, I just purchased these pretty 2-toned ones from I Am Roses. I think they match the overall cake very well. 


Top

The pearl hat pin is again holding the center flower on, and it with it's leaves, are covering the gift card and slot in the top of the box. The skinny yellow ribbon is attached to the gift card for easy removal and then the center flower can be replaced! 

I mounted the cake on white with punched border, then on gold mirricard, and finally the chipboard base to stabilize the whole project.

OK... I think I have covered it all.... so I hope y'all like this box as well as the first one!


Supplies:
CTMH: Cardstock - Amethyst, Blush, Sunkiss Yellow and White Daisy; Inks - Cotton Candy, Gypsy and Sunkiss Yellow; Reinker - Sunkiss Yellow; Pearl Paint; Bitty Pearls
Lindy's Stamp Gang: Glitz Spritz - Sunset Pink
I Am Roses: 2-toned leaves
Liquid Pearls - White Opal
Flower Soft and Flower Soft Glue
Marco's Paper: Mirricard
Other items: Assorted punches; foam brush; X-acto knife; paper mache nesting boxes; Scor-Tape; hot glue; glue dots; chipboard; pearl hat pin; white and yellow satin ribbons; buttons; brads




Saturday, October 19, 2013

Anniversary Card for the Hubby


Today is our 33rd Anniversary!

I just wanted to share the card I made for my hubby.

Front View
I kept it very simple and masculine.
Just some embossing, distressing
and a simple sentiment
held on with eyelets and baker's twine!

This is a close-up of the distressing techniques...
I used a block sander to gently
sand off some of the outer green color
to expose the white core center of the
cardstock, after I had embossed it
AND I scraped the edges of the
green layer with my scissors.
So simple!

Inside of card

I can't take credit for the inside idea,
but I did do the math, LOL!

I saw this idea on Pinterest probably over
 a year ago, and thought I had pinned
it to one of my boards. I searched
for quite some time trying to find it
to give proper credit, but for the life of
me, I could not locate it.

I have over 125 boards on Pinterest
with almost 26,000 'pins'.... and
I looked on every board I thought I 
could possibly have pinned it to, but to no avail.
So, I either overlooked it or I didn't
pin it to begin with, so whoever I got 
this from.... thank you for the inspiration!


Supplies used:
Fiskars - Country Colors Cardstock - Kraft (for card base)
Close To My Heart (CTMH) - Colonial White & Garden Green Cardstock;                                                                    Chocolate Ink Pad 
Cuttlebug - Embossing Folder Leafy Branch
Stampin' Up! Word Window Punch - elongated... see how here.
MS Word - 8 different fonts for sentiments
Kraft Outlet - (online) Brown Baker's Twine
Scor-Tape
Extras: antique copper eyelets from my stash, sanding block and scissors,
             Cuttlebug Machine


Thursday, October 17, 2013

Meet Benjamin!

Even though it is technically October 17, I haven't been to bed yet, so for me it is still October 16, 2013, so I'm posting this really on Wednesday :) 

And what a special day it has been! Our second grandchild was born today! Meet Benjamin:


This is our son's first child, and what an excited and proud poppa he is! Momma is doing great, as well. :)

Benjamin was born at 8:11 AM. He weighed in at 8lbs 6ozs and is 20.5" long.... a hefty and handsome young man! I can't get over how small he looks compared to his Daddy's hand on his belly, but then again, our son is anything but a small man.... or even an average one, LOL!..... He's a big and brawny man at 6'7" tall and 300+ lbs! Although starting out, he was only 3ozs heavier than Benjamin and exactly the same length, so I think Benjamin just may follow in his Daddy's footsteps!

My hubby is over the moon at having a Grandson.... you know, that typical "guy" thing, with our only son having a boy, to carry on the family name and all. I'll never really understand that "need", and that's probably because I'm not a guy, so what does it matter?!!! Our granddaughter already has Grandpa wrapped around her little finger, just as her momma still does, LOL!!... Anyway....

Congratulations to our son and daughter-in-law on their new bundle of joy! :)


Saturday, October 12, 2013

Random-Stamped Card with Burlap!


I was going to sit down to make my hubby an anniversary card, when I got side-tracked by a pile of papers on my desk! I ran across 4 sheets of text weight paper with matching envelopes, in varying colors of Kraft, which I had gotten from Kraft Outlet

I had no intention of ever using them as stationery, since all but one was too dark, in my opinion, for writing anything! So I decided to use the paper on cards instead. I've only completed 2 of the 4 cards, but I'm only going to share one of them here..... the first one turned out horrible less than I expected, LOL! Card finished size is 4" x 8.5":


click on photo to see it larger

I used the lightest paper here, called Buff Ivory. I random-stamped the front using the first and second generation stamping technique. I just used first generation on the corner of the envelope and at the bottom of the inside panel of the card. 

Below, you can see the inside of card.... (I don't know why the buff ivory paper looks so white in this photo. I took it right after the photo above... just moved the envelope and opened the card. Everything else was the same!)


I mounted the stamped papers on a brown cardstock base. Then I added the burlap and other embellishments to decorate, but left it blank... without sentiment. I can use this card for a number of different occasions, so I'll add the sentiment when I'm ready to use it :)


ITEMS USED:
Buff ivory paper and envelope; brown Baker's twine - KraftOutlet.com
Crocheted ribbon; Burlap ribbon; Sunset ink pad - CTMH
Stamp Set - Baroque Motifs - Stampin' Up!
Card base - Brown cardstock "Country Colors" - Fiskars
Scor-Tape
flower and button from my stash


Thanks for stopping by! :)
Paula


Related Posts Plugin for WordPress, Blogger...