Thursday, August 24, 2017

Anniversary Roses

These cards were so easy, because I didn't have to do anything but pop out these
pre-colored die-cut images and glue them to a card base! Then stamped the "Happy Anniversary" sentiment on the front or inside

(click on photos to view larger images)

the sentiment is inside on this card

I did pop-up the left rose on this one to give it some dimension.

That's all for today. Thanks for stopping by :)


Saturday, August 19, 2017

Easy Sympathy Card


Another fast and easy sympathy card for another member of the same family as the cards I posted a couple days ago (see here). I used a pre-printed card front in a paper pack from Heartfelt Creations. I would have liked to stamp "with sympathy" inside the circle in the bright light area, but didn't have anything small enough to fit the space.

(click on photos to view larger images)


Now here's a look inside:


Cards like these are good when you're in a pinch..... now I really need to work on my stash!


Have a great day! :)


Thursday, August 17, 2017

Super Simple Sympathy Cards

I have known I needed to get busy and make some more sympathy cards, as I had depleted my meager stash. But when a large family I know, lost their beloved dad and grandfather in death not too long ago, I had not gotten any made yet.

So I had to make some quick and easy ones.... fast!..... My solution was finding some patterned paper in my stash that was appropriate and stamping the sentiments.

(click on photos to view larger images)

These were super simple... A2 size cards.... I cut the patterned paper slightly smaller to leave border of base showing. Then stamped the sentiment on front and inside. Done.

closeup of one on the right above


another one of the three:

They all look slightly different with the random daffodils in different spots.

the inside sentiment


I have another one to share in my next post that was not part of these daffodil paper ones. Until then... thanks for stopping by :)


Saturday, August 12, 2017

Don't Laugh!

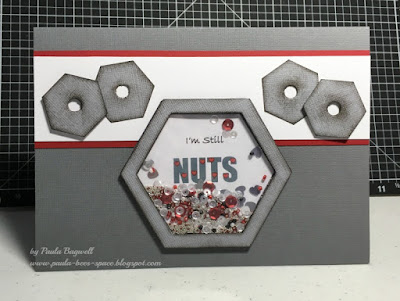
I decided that for my very first shaker card, I would make my hubby one for our anniversary.....

This is what I used to make the shaker part... Spellbinders Hexagon dies to make a frame, but not in white..... I used gray, and a sentiment created in MS Word...... (remember the sentiment!)...


When I had it all cut out, I colored the hearts on the letters NUTS in red, ink distressed the frame edges, and added the dimensional tape, I of course had to lay it flat to fill with the shaker elements before attaching the clear acetate and frame top. This is what it looked like lying flat:


I wasn't sure I had filled it enough with Pretty Pink Posh's silver heart sequins, their clear and silver cupped sequins, and the red and clear seed beads plus tiny silver beads from my stash, but I went with it...... I wanted it to look nice when the card was standing up, when everything would fall to the bottom, so I glued a few of the elements in place. Then I stood it up!! 

Well it turns out I had PLENTY.... even MORE THAN ENOUGH.... 

Here's the  Don't Laugh! part of this post..... 
My "I'm still nuts about you" sentiment turned into:

(click on photos to view larger images)

Yep, that's right!.... "I'm Still NUTS"!!!.... I had wanted it to be the perfect shaker card for my wonderful husband of more than 30 years!... I almost cried before my sense of humor returned. It was too late anyway to turn back, as everything was glued to card front, and I was NOT starting over. So he ended up with a flawed shaker card, but that's OK, because he has a flawed wife!


As you can see, the "nuts" are the masculine equivalent of  'nuts & bolts'. I made them by first punching holes along a strip of cardstock, spaced apart enough to punch a hexagon around them (Stampin' Up punch). I inked distressed them all with black, as I had the center shaker nut, and popped up a couple for dimension.

Next is the inside.... I made it to match the front of course, but I used a stamp & die set from Papertrey Ink called One Big Happy... 'happy' is die cut and 'anniversary' is stamped.


I put another 'nut' on the envelope. For some reason the envelope looks like it was bent in 1/2 at some point, but I assure you that it was not... it was flat!


I also shook the contents up on an angle for this pic, but no matter which way I got them to go, I could NOT uncover the entire sentiment all at the same time...

Lesson learned... don't fill shaker so full, LOL!!


Thanks for stopping.... and more thanks to those of you who didn't laugh :)


Tuesday, August 8, 2017

Anniversary Hearts


(click on photos to view larger image)


I wanted a lot of hearts for this anniversary card, so I started with embossing  the white front panel with a tiny hearts embossing folder. Then I matted an extra piece and added it on top. 


I used a heart punch to make the patterned hearts from CTMH Bella paper (retired)... and added a little bling to each one.

Now you just get a peek of the inside here:


But here's what the inside looks like.... I repeated the matted strip piece and added overlaying hearts. The sentiment is from Papertrey Ink's One Big Happy set... the "happy" is from a die in the set and the "anniversary" is stamped.


Here's a closeup of the inside hearts:


I punched out 2 more hearts from white cardstock and layered them under the top heart to give it a little more dimension.

I really love how it turned out and it was very easy to do.


Saturday, August 5, 2017

Thoughts of You


Recycled card... I saved the card front piece from a card I received and put it to good use. Just popped it up on a new card base. Quick and easy and environmentally helpful... win, win, win!


Thanks for stopping by :)


Wednesday, August 2, 2017

Beautiful Irises

Couldn't resist sharing these beauties that were in our backyard in April.... gorgeous!...
I hope you like them as well.


(both photo credit to my hubby - Brad Bagwell)


Friday, July 28, 2017

His & Hers Towels Anniversary Card

A few days ago, I shared the 2 anniversary cards my sister & I made for each other's son (our nephew's) and their wives. Today I'm sharing the design we each made for our own son's & DIL's !!!

HIS & HER TOWELS

(click on photos to view larger image)


I'm only showing my card this time, because hers looked exactly the same... no color changes! 


I used white mulberry paper over white cardstock for texture on the towels. Wrapped twine around two brads to make the towel bar. The sentiment is from Papertrey Ink's One Big Happy set... the "happy" is from a die in the set and the "anniversary" is stamped.

A closer look at the towels:


The sentiment inside was done in MS Word.


That's all for now.... have a great evening! :)


Monday, July 24, 2017

Pair of Anniversary Cards for Cousins

My nephew's wedding was 364 days after my son's wedding (the cousins)..... which means their anniversaries are just a day apart each year! 

That's a benefit, cause every year now I make their cards at the same time. My sister joins me, and we each usually make the same 2 cards for our boys and their wives, just making sure we send them opposite so they don't end up with the same card design from us both!


(click on photo to view larger image)

For their past anniversaries, we made these cards with our daughter-in-laws in mind. We definitely made "girly cards, and we did them in their favorite colors.... pink (for my DIL) & purple (for her DIL). BUT these we sent opposite! My sister made and sent the pink one to her nephew (aka my son) and his wife, and I made the purple one for my nephew (aka her son) and his wife...... confused yet?

Anyway... the photo above shows both cards, but it doesn't do justice to all the glittery goodness down the right side of each. It's just plain hard to photograph glitter! A stencil was used on the white part of background and edge cut with a die. The focals are 3D decoupage layers. We added a few sequins, stamped "Happy Anniversary" on the inside and called it done!

Here's a pic of the card I made:


Well thanks for stopping by and putting up with my nonsense! :)


Tuesday, July 18, 2017

Stunningly Ominous!.... Mammatus Clouds...

Back in mid-April, my hubby took this photo from our driveway when he got home from work...


Mammatus Clouds
at sunset


Related Posts Plugin for WordPress, Blogger...