Wednesday, May 30, 2012

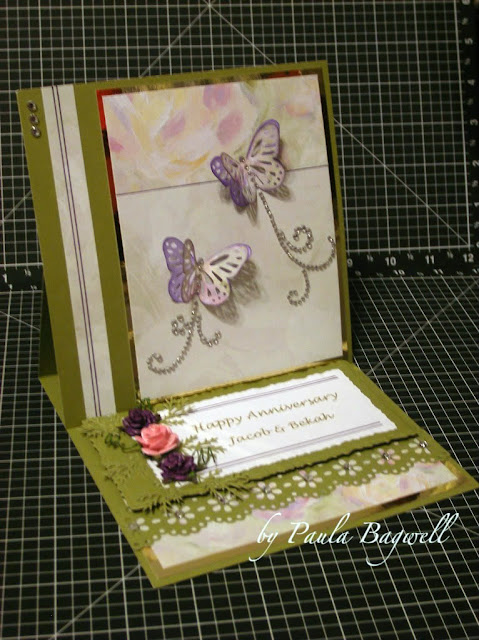
Anniversary Twisted-Easel Cards

Well, a little over a week ago, I promised to post some of my
Twisted-Easel Anniversary Cards. (To see the post with the regular easel anniversary cards, click here.)

Since we're still in my fiscal year according to anniversary cards
(Oct2011-Sept2012), lol, these cards are still 6x6 and done in
CTMH paper Floral Impressions (retired).


Amethyst base with GOLD mirricard, double-layer butterflies
inked in Gypsy on Olve and reversed to Olive on Gypsy

Olive base with GOLD mirricard and the same butterflies,
a different patterened paper from same set

This one is 'twisted' in the opposite direction.
This is the closeup of the top portion
and this is the closeup of the sentiment --- you can see the shadow
from the loops of the paper lace down on the sentiment...
the flash caused the mirricard to shine down, but not through the paper!
(all flowers are from I Am Roses and painted with
and the final card for today!

So that's it for now.... as you can see I made 3 of the 4 very similiar, with just a few differences like the placement of the bling, etc.

Saturday, May 26, 2012

Texture Spray Resist

Beate from SCS shows how to make a stamped "resist" pattern with Goosebumps Texture Spray (without spraying)! Watch this short video to see how a make these pretty images appear before your eyes! :)


Watch on YouTube: HERE


Wednesday, May 23, 2012

Super Cool - Stucco!

Stucco as an embellishment? or background? What? I'm kidding, right?...

NO.... no fooling!.... seriously!... and in colors to match your projects!
This is a really super cool faux-stucco technique and can even be used to "grunge" up a page. This video tutorial is from a DT Member from
Lindy's Stamp Gang, but I don't know which person exactly. :(

Anyway... watch the video to see how easy, how dimensional, how unique this technique is....


Watch on YouTube: HERE


Wasn't that fantastic? Imagine the colors, the possibilities!
Just another use for those wonderful Magicals!


Sunday, May 20, 2012

Anniversary Easel Cards

If you don't know it already, I'm a little OCD! I can't seem to change the type of anniversary cards that I make except on a yearly basis! And "my" year doesn't start in January either! It starts in October.

Why, you ask? Because that is when my BFF's anniversary is (and my sister's was, as well, but not anymore), so I start with them! So then everybody else I know, gets a card with something of the same theme...
like last year - Oct2010 to Sept2011 - everybody got cards made with the CTMH Miracle paper (retired), but I didn't take any photos of them. :(

This year (Oct2011 thru this coming Sept) I started by making both of them Double-Twisted Easel Cards. If you'd like to see those cards, check them out here and here.  

So this year, everybody is getting an easel card whether it's a regular easel, a twisted-easel, or a double easel. And all, except those first 2 double-easel cards, will be 6x6 and done with CTMH Floral Impressions paper (retired)! I've posted a few of them below:

grey flannel base and olive mat with double amethyst layered butterflies

olive base with gold mirricard mats and double-layered butterflies

This next one has the same olive and gold,
and the butterflies are still 2 layers but inked with olive
on gypsy and the other as gypsy on olive!


These 3 are the same - olive base with gold mirricard with
the opposite inked 2 layer butterflies. The center
card just has a different greeting shape and configuration.

I also decided to do a wedding card as 5x7 easel:
This one has amethyst as the base and silver mirricard mats.


This final one here is done on an amethyst base as well,
but has purple mirricard mats!


I'm loving this Mirricard! If you click on the photos to see them bigger, you can see how really "mirror-like" it is by the reflections you can see.
It is so pretty!

The flowers are painted with Lindy's Stamp Gang Magical Micas, just like the posts of the double-twisted easel cards I mentioned above.

I'll post some 6x6 twisted-easels soon, so come back and check them out!
Thanks for stopping by today! I'm glad you came :)


Thursday, May 17, 2012

Corner Bookmark TUTORIAL

Super simple (and I do mean really, really simple!) corner bookmarks from Christina of Card Making Magic! Would probably be perfect weight and of course coordinated if made with CTMH double-sided B&T paper from any of the paper packs. Would also make great gifts for avid readers..... make several different ones for a gift set!


Watch on YouTube: HERE


See... I told you they were super simple!


Sunday, May 13, 2012

Blossom Petal Card by Tami White


I saw this card on YouTube and thought it was so pretty. SU consultant
Tami White made this with their Blossom Petals Punch:


Below is Tami's video tutorial on how to make this card. It's really very simple and can probably be done using a variety of different ways to
make the petals:

Watch on YouTube: HERE


Thursday, May 10, 2012

Water Card

This is a water card USING REAL WATER!!! (and it doesn't leak!)

Noreen, from Katy Sue Designs, shows how to make this adorable bath-time Mabel Attwell Water Card using products from Flower Soft.(at Katy Sue's) 

So click on the link below to watch this "cool" - pun intended -card demonstration! :)


Watch on YouTube: HERE


Monday, May 7, 2012

Embossed Kisses

This stamping technique is almost exactly like the Stamp Kissing technique, only instead of using 2 stamps, you use a stamp and an embossing folder. Beate from SCS shows us how really simple this is:


Watch on YouTube: HERE


Friday, May 4, 2012

Miniature Hat Boxes

For my last 'baby shower' post, I made these 3 miniature hat boxes
(with small gifts inside, of course!). The nursery for our granddaughter
will have some paisley printed bedding, so I wanted to stay with that theme and CTMH More to Adore paper was the perfect choice!

Click the photos to see larger image

As you can see, I made the middle size one backwards from the large and small ones. I used Mod Podge for Paper (following their instructions) to get the papers stuck to the boxes, just smoothing it out with my fingers as
I went along. Then after drying for at least 2 hours, I put one coat on top, just on the outsides and left the insides alone. 

All the insides are the same.... they all look like this:


It was quite a task to get that paper done "just so" on the inside of each box top and bottom! And I thought that was difficult until I started on the outsides, lol! Those paper mache boxes are NOT smooth and NOT perfectly round, and even 12x12 paper does not go all the way around anything except the smallest box bottom, inside and out. I had to piece together all the other paper parts, including the outside rim of the small box top! Being OCD didn't help, because I just had to have the stripes match up around those sides! Needless to say, there were some wrinkles when all was said and done, but for me, the end results were worth the headaches along the way! They turned out better than I thought they would, and my daughter loved them!


I used a variety of flowers and leaves, and even a 'spray' from I Am Roses to decorate each top, attaching them with a low temp hot glue gun. Everything you see came as that color except the yellow flowers... they were originally white. I painted them with Yellow Rose of Texas Magical Micas from Lindy's Stamp Gang, and then spritzed all the flowers and leaves with Medieval Gold Glitz Spritz.... so pretty! I chose yellow, even though it's not part of the colors in the paper set, because not only do some of the flowers have yellow stamen centers, but the baby's room is painted yellow! (pink, yellow, and green are her colors) I think I covered all of them in this design and even added the brown florals to go with the paper! The final touch were the stickpins.

Here's a close-up of the large arrangement:

Thanks for stopping by to check these out! Leave me some love in the comments if you have the time, and let me know what you think. :)


Supply List:

CTMH:
     More to Adore Paper pack (retired)
     Pretty Pins (reitred)
Darice Paper Mache Nesting Boxes
Mod Podge for Paper by Plaid
I Am Roses - variety of flowers, spray, and leaves
Lindy's Stamp Gang - Glitz Spritz and Magical Micas
hot glue gun


Related Posts Plugin for WordPress, Blogger...