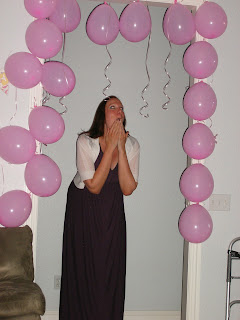
While my daughter came home for a short weekend visit, we gave her a "family only" baby shower. I'll be throwing her an "online" baby shower in a few weeks (which should prove quite interesting!). Why online? I'll tell you!....
She can't have a "normal" shower with all her friends and family in attendance, because:
1) She lives in one state and ALL her family live 1000 miles and several states away!
2) She's only been in her locale for a few months (moving there from the West, more
than half-way across the country) and she does not work in an office setting with a
bunch of gals around..... just one woman, the rest men.... so I can't rely on them to
give her a shower!
3) She went to college near the East coast (still half-way across the country from home,
just in a different direction!)
4) ALL her college friends were from all over the country and overseas!
5) And while she was in college, we moved to a different city than where she went to
jr. high and high school!
So, I think it's pretty obvious by now and ya'll have realized, that it's impossible to have a "normal" shower when everybody lives all over the place! Hence, the small "family" shower when she was home for the last time before the baby comes and an "online"
one for everybody else!
Now.... back to our little shower at home..... it was a surprise, as you can probably tell from the banner, and she really had no clue! Her dad dragged her off to Sam's Club, while I, Carol and Tom desperately hurried to get all the pink balloons up (it's a girl!).
Her brother lives about 90 miles from us, so he came up and drove me crazy for the last half hour before the party started! He just loves to
to come straight from work!
Even though we had major problems with getting the balloons to stay in place, we were ready on time. Everything went as planned, EXCEPT.....
Nobody could yell "surprise"!!! (Side note: our garage is attached to the house via entrance into the laundry room. Then there is a short hallway that goes from the laundry room straight into the Master Bed/Bath, but to get there, you must walk by the entry door into the living room that's off that hallway to the right. We had hung a bunch of the pink balloons in that doorway to the living area.) The ONLY thing we did not plan for, was the fact that while they were gone, she drank 64oz of fluid and by the time they got home, she desperately needed the bathroom since the baby was standing on her bladder!
Of course she saw the pink balloons on her way by the doorway, stopped long enough
to hold her finger up and say "one second" before dashing on, and... we all were just dumbstruck! Literally.... time went by and we just sat there looking at each other!
I'm sure it was only for a few seconds, but it seemed to go on forever! Finally someone broke the silence and asked "are we still supposed to yell surprise?"
Well, when she returned, I had to make her pose for her "surprised look" photos!
So fake! But cute expressions anyway!
Then after all the greetings, we had dinner, cake & punch, and the unwrapping of gifts! So all turned out good in the long run. :)
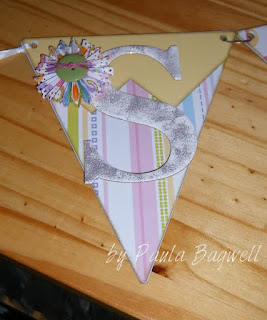
Now, a little more about the banner.... here's some close-up shots of some of the individual pennants:
I absolutely LOVE how this turned out! It was my very first banner. I used a really old paper pack from CTMH called Flower Power with Buttercup cardstock, and covered the CTMH My Creations Banner. The pennants are each 6" across the top and 7" tall. I'll list supplies at the end of the post.
I used 4" chipboard letters I had custom ordered from an Etsy shop. First I triple embossed them with clear thick EP and then twice with White Daisy. Before applying the final coat of White Daisy, I sprinkled pink glitter on them and embossed the glitter right into the WD layer. On the "baby" word chipboard, I covered it more completely with the pink glitter before embossing.
I also used a variety of floral embellishments, making my own fancy-punched accordian rosettes with the Flower Power paper (inspired by Bev - SEE accordian rosette picture link in left sidebar to her blog). The embroidered flower on the "R", I dyed with Cotton Candy Reinker (it was originally white). All the letters are popped up with dimensional tape, and I also distressed the edges of all the papers with Desert Sand ink.
Well, I think that's all except the
Supply List:
CTMH Products:
My Creations Banner
Flower Power paper pack (retired)
Buttercup cardstock
Desert Sand ink pad
White Daisy Embossing Powder
Cotton Candy reinker
Custom 4" Chipboard Letters from Glitter Dust Designs on Etsy
I Am Roses Embroidered Flower
Martha Stewart Lace Border Punch
Clearsnap Cotton Candy Glitter
Basic Grey Lily Kate Ribbon
Scor Tape
Glue Dots
Dimensional foam tape
Ultra-thick clear embossing powder
Embossing Gun
Miscellaneous buttons, flowers, brads, embroidery floss, and "baby" word chip from stash


