
Wednesday, November 2, 2011
Short Hiatus.... at least I hope!
Just popped in quickly to make a short update... I have had a family crisis situation here, and haven't had time to blog. I wanted to let you all know that I was hoping this would be just a short break, but it looks like I'll be tied up for several more weeks, maybe a month or more. I'll get back to blogging asap. In the meantime, please don't give up on me... I'll be back!
Monday, October 24, 2011
My First Blog Award!
I was so excited to get this award yesterday! I didn't even know about it until after 11 last night... such a busy day, I had not had any time before then to get on the computer!
Anyway... Thank you, Rosalynd, for honoring me with this blog award as one of your Top 5 picks! Check out Rosalynd's blog here. Like me, you'll probably like what you see, so become her follower, too!

1. Thank the giver and link back to the blogger who gave it to you.
2. Reveal your top 5 picks and let them know by leaving a comment on their blog.
3. Copy and paste the award and rules on your blog.
4. Have faith that your followers will spread the love to other bloggers.
5. And most of all - have fun!
OK... now for my Top 5 picks:
1) Pam Thorn at PJ's Corner - I love the way she embellishes ALL of her
layouts... just the "right" amount and all
beautiful... haven't seen one yet that I didn't like :)
2) Corina Mitchell at My Creative Ink - Oh my, what a very creative woman!
When I grow up, I want to be her! LOL!...
wonderful "outside the box" creations and her
LO's are just lovely!
3) Bev Tiemann at Paper and Fiber Arts - WOW! Can this woman make
absolutely gorgeous layered accordian rosettes!
Be sure to check out the whole separate PAGE
of the rosettes on her blog (tab link under her heading)
4) Sharon at The Night Owl Scrapper
5) Yvonne at Scrapping is Bliss
(These last 2 ladies are Design Team members for Lindy's Stamp Gang, along side great creative people like Tresa Black! I chose these 2 ladies
because they not only use Lindy's Stamp Gang products, but they also
use I Am Roses mulberry flowers... and at this moment, I'm 'addicted' to both these companies products! LOL!)
Go check out all these ladies awesome blogs! Just click on the 'green' blog names above to get there!.... I get so much inspiration from them, so I know that you will as well. While you're there, become a "follower"!
You can click on the 'red' links to find those wonderful products, too!
Anyway... Thank you, Rosalynd, for honoring me with this blog award as one of your Top 5 picks! Check out Rosalynd's blog here. Like me, you'll probably like what you see, so become her follower, too!

Liebster is a German word that means beloved or favorite. This award is only for blogs with fewer than 200 followers, so up-and-coming bloggers are recognized for their creative works!
Here are the rules to accept this award:
1. Thank the giver and link back to the blogger who gave it to you.
2. Reveal your top 5 picks and let them know by leaving a comment on their blog.
3. Copy and paste the award and rules on your blog.
4. Have faith that your followers will spread the love to other bloggers.
5. And most of all - have fun!
OK... now for my Top 5 picks:
1) Pam Thorn at PJ's Corner - I love the way she embellishes ALL of her
layouts... just the "right" amount and all
beautiful... haven't seen one yet that I didn't like :)
2) Corina Mitchell at My Creative Ink - Oh my, what a very creative woman!
When I grow up, I want to be her! LOL!...
wonderful "outside the box" creations and her
LO's are just lovely!
3) Bev Tiemann at Paper and Fiber Arts - WOW! Can this woman make
absolutely gorgeous layered accordian rosettes!
Be sure to check out the whole separate PAGE
of the rosettes on her blog (tab link under her heading)
4) Sharon at The Night Owl Scrapper
5) Yvonne at Scrapping is Bliss
(These last 2 ladies are Design Team members for Lindy's Stamp Gang, along side great creative people like Tresa Black! I chose these 2 ladies
because they not only use Lindy's Stamp Gang products, but they also
use I Am Roses mulberry flowers... and at this moment, I'm 'addicted' to both these companies products! LOL!)
Go check out all these ladies awesome blogs! Just click on the 'green' blog names above to get there!.... I get so much inspiration from them, so I know that you will as well. While you're there, become a "follower"!
You can click on the 'red' links to find those wonderful products, too!
Sunday, October 23, 2011
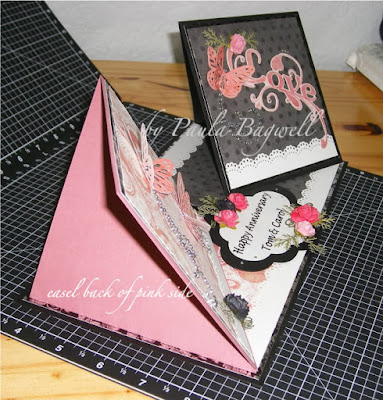
Double-Twisted Easel Card 2!
Well here is the second Double-Twisted Easel Card I've made this month for an Anniversary! (Actually this is only the second one I've ever made... see the first one here) This time it's for my sister and her hubby, and I'm entering it into my very FIRST challenges ever!
The challenges are:
Beary Sweet Scrap Challenge #36 - Double or Nothing - 2 easels
Totally Papercrafts Friday Challenges #89 - Layer upon Layer - for multiple layers!
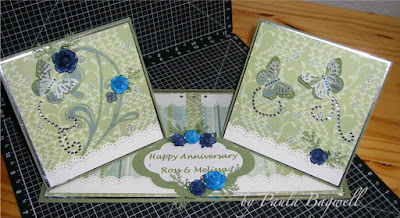
Green is my sister's fav color and since my bro-in-law likes the Denver Broncos, I figured he might like blue! But instead of doing a "his & hers" theme by sides like the first one, I decided to combine the colors together.
I made this the same way... still a 6" x 12"... (except for a few things which I will explain in this post).... if you're curious as to what I did, check out the first one for a more thorough explanation, as I'm not going to go into it all again in this post.
The first thing that is different, is that I did have to "build" this one on a thin piece of chipboard for the needed strength to hold the weight. I did not acheive the same sturdiness as the first with just layers of cardstock, because on this one, the shiny mats around the base and easel panels are just very thin paper instead of heavy cardstock!
Next photos are the close-ups of each side:
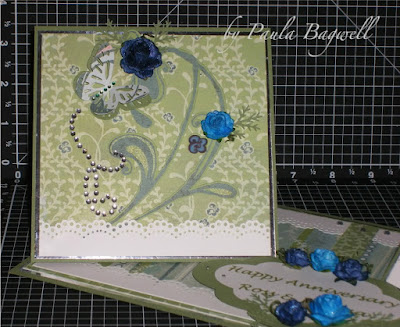

 Lace border and Leaf punches from Martha Stewart
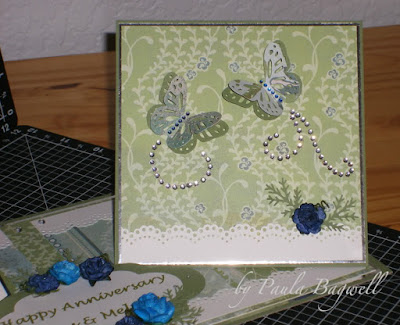

The challenges are:
Beary Sweet Scrap Challenge #36 - Double or Nothing - 2 easels
Totally Papercrafts Friday Challenges #89 - Layer upon Layer - for multiple layers!

Green is my sister's fav color and since my bro-in-law likes the Denver Broncos, I figured he might like blue! But instead of doing a "his & hers" theme by sides like the first one, I decided to combine the colors together.
I made this the same way... still a 6" x 12"... (except for a few things which I will explain in this post).... if you're curious as to what I did, check out the first one for a more thorough explanation, as I'm not going to go into it all again in this post.
The first thing that is different, is that I did have to "build" this one on a thin piece of chipboard for the needed strength to hold the weight. I did not acheive the same sturdiness as the first with just layers of cardstock, because on this one, the shiny mats around the base and easel panels are just very thin paper instead of heavy cardstock!
Next photos are the close-ups of each side:

left side

right side
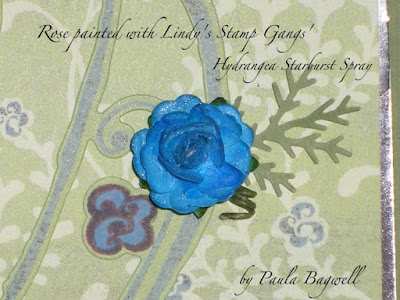
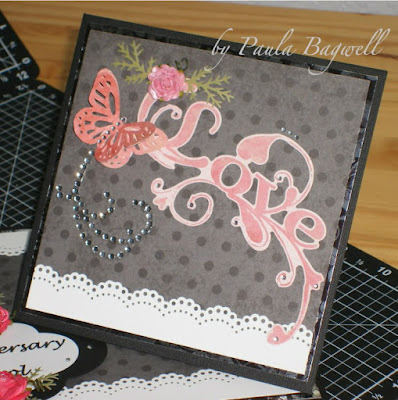
Now the center sentiment all decorated with painted mulberry flowers (they were originally white) from I Am Roses:

Click on photo to view LARGER and see all the "sparkling" roses!
For these roses, I also used Lindy's Stamp Gang products... are you surprised at all by this? LOL! I "painted" the colors on just like before (again see the first double-twisted easel card post if curious!)
Products from LSG that I used for these roses are:
Starburst Sprays - Afternoon Delight Denim and Hydrangea Blue
Glitz Spritz - Scintillating Silver
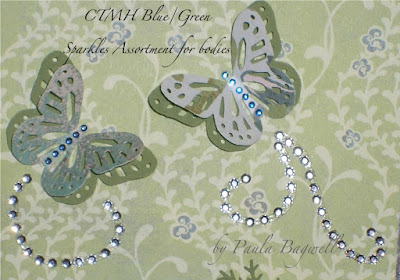
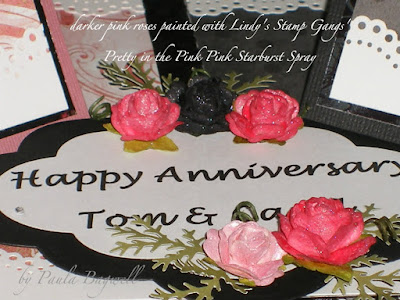
Here are some close-up shots of the roses and butterfly embellishments:

Rose done in Afternoon Delight Denim Starburst Spray topped with
Scintillating Silver Glitz Spritz from LSG

I had to 'color' the flower that is part of the sticker to match since it was pink!
I used CTMH markers to change the colors!
Rose done in Hydrangea Blue Starburst Spray, again topped
with Scintillating Silver Glitz Spritz

Check out the "sparkle" on this darker rose... AWESOME!
Butterfly punch is also Martha Stewart.

Bling used for bodies are from the Green/Blue assortment from CTMH
List of supplies:
Basic Grey Two Scoops paper pack with stickers
Bazzill cardstock - Guacamole
Metallic Foil paper by Hygloss
CTMH cardstock - White Daisy (for lace border)
CTMH markers - Outdoor Denim and Crystal Blue
CTMH Sparkles (clear) and Sparkles Green/Blue Assortment
Scor Tape
Herma Dotto
Spellbinders Nestabilties Labels #6 Dies
Martha Stewart Punches - Lace border, Butterfly and Leaf
Lindy's Stamp Gang Starburst and Glitz Spritz Sprays (as described in post)
I Am Roses - 3 sizes of white mulberry roses
Rhinestone Flourishes (from my stash - don't remember manufacturer)
Pop-Dots for dimension of sentiment
Chipboard
MS Word computer Font
Saturday, October 22, 2011
Double-Twisted Easel Card
This is the first of two Double-Twisted Easel cards I've ever made!
I combined two video tutorials (I have saved here on my blog....
Twisted Easel Card and Ouad-Easel Card), and came up with this 6"x12" card!
These types of cards are demensional, not only when standing the easel up, but also when closed. Due to the "must have" bumped-up element that is attached to the bottom layer, which is needed for the easel to rest against when standing, a regular envelope is not always workable. A demensional Envelope Box is required in some cases. This particular card is especially deep when closed because of the roses.... almost an inch!
I think it turned out fairly well, except since it was 12" long, I couldn't make my own envelope box for it anyway, so I had to wrap it in tissue instead! LOL! :)

I made this in pink and black (their favorite colors) for my BFF and her hubby for their 36th Anniversary earlier this month... kind of a "His & Hers" thing. The lace borders were made with the Martha Stewart punch.
Here's a close-up of the left side (Pink - Hers). On this side, I used paper from Basic Grey's Two Scoops set (I had this set in my stash):

And here is a close-up of the right side (Black - His). On this side, I used paper from CTMH Sweetheart set (the black polka-dotted paper -
now retired) and the "Love" sticker is from Basic Grey's Two Scoops:

I also used CTMH cardstock colors in Black, White Daisy and Olive and Bazzill cardstock in Chloe. The card base, as well as the easel panels, have a black & silver FOIL cardstock mat from Paper Pizazz. To make a really strong base and easels, I wanted to use several cardstock layers to hold the weight. I also used strong Scor Tape to keep it all together.
I just used Herma Dotto tape on the top patterned papers. The center sentiment was printed in MS Word and was cut on my Cuttlebug with Spellbinders Nestabilties
Labels #6 dies, matted together and then popped up with dimensional pop-dots.
Here's a close-up of the center sentiment... see how the easels rest against it's edges on the back side?
Make sure you click on the photo above to see those awesome roses up close! Look how they sparkle... and the photo doesn't even do them justice!
I just LOVE the way these white mulberry roses (in 3 sizes) from
I Am Roses turned out! I used Starburst Sprays, in Midnight Rendesvous Raven and Pretty in the Pink Pink, Glitz Spritz in Scintillating Silver (for more colors, just type in "glitz" in their search bar), and Magical Micas in Cotton Candy Pink, all from Lindy's Stamp Gang to paint them..... yes, I said PAINT.
I used a waterbrush, from a set from the same company, to paint the Magical Mica powder on the petals... just made a small nickel-sized puddle
of water on my Ranger non-stick craft sheet, then dipped the tip of
the damp brush into the mica powder pot to "grab" a little mica powder
and swirled it into my puddle of water. Mixed very well... then viola... paint!
And beautiful, sparkly paint at that!

It was so, so easy to do, that I decided to just spray the Starbursts colors on to my craft sheet, too! I added a little water from the waterbrush, mixed it up and painted the same way! With painting, I had much more control over exactly where the color went! And much LESS mess than if I had actually sprayed the flowers individually themselves, especially to cover all sides of each of the petals!
After the flowers had all dried, I found that the Cotton Candy Pink ones were much more "sparkly" than the other two colors, even though they did have some sparkle as well. That's the power of "Magical Micas"!... so I 'painted' the Scintillating Silver Glitz Spritz on the top of the petals in the same fashion. The Glitz Spritz's just give the glimmer and let the color shine through! The result was spectacular! I could not be more pleased with how they turned out. :)

If you haven't tried these products yet, visit their online store and try them out.
Anyway... back to the card... here's some final close-up pictures:

I combined two video tutorials (I have saved here on my blog....
Twisted Easel Card and Ouad-Easel Card), and came up with this 6"x12" card!
These types of cards are demensional, not only when standing the easel up, but also when closed. Due to the "must have" bumped-up element that is attached to the bottom layer, which is needed for the easel to rest against when standing, a regular envelope is not always workable. A demensional Envelope Box is required in some cases. This particular card is especially deep when closed because of the roses.... almost an inch!
I think it turned out fairly well, except since it was 12" long, I couldn't make my own envelope box for it anyway, so I had to wrap it in tissue instead! LOL! :)

I made this in pink and black (their favorite colors) for my BFF and her hubby for their 36th Anniversary earlier this month... kind of a "His & Hers" thing. The lace borders were made with the Martha Stewart punch.
(Just a side note .... Remember, to see any photos LARGER,
just click on them as usual.)
Here's a close-up of the left side (Pink - Hers). On this side, I used paper from Basic Grey's Two Scoops set (I had this set in my stash):


This photo shows the easel back
And here is a close-up of the right side (Black - His). On this side, I used paper from CTMH Sweetheart set (the black polka-dotted paper -
now retired) and the "Love" sticker is from Basic Grey's Two Scoops:


This photo is also the easel's backside
I just used Herma Dotto tape on the top patterned papers. The center sentiment was printed in MS Word and was cut on my Cuttlebug with Spellbinders Nestabilties
Labels #6 dies, matted together and then popped up with dimensional pop-dots.
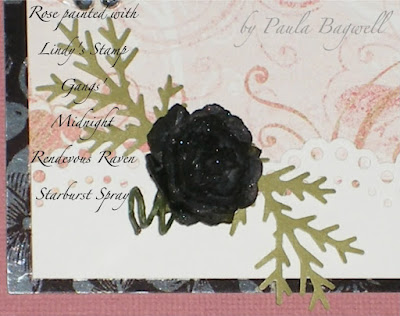
Here's a close-up of the center sentiment... see how the easels rest against it's edges on the back side?

Roses are painted with products from
Make sure you click on the photo above to see those awesome roses up close! Look how they sparkle... and the photo doesn't even do them justice!
I just LOVE the way these white mulberry roses (in 3 sizes) from
I Am Roses turned out! I used Starburst Sprays, in Midnight Rendesvous Raven and Pretty in the Pink Pink, Glitz Spritz in Scintillating Silver (for more colors, just type in "glitz" in their search bar), and Magical Micas in Cotton Candy Pink, all from Lindy's Stamp Gang to paint them..... yes, I said PAINT.
I used a waterbrush, from a set from the same company, to paint the Magical Mica powder on the petals... just made a small nickel-sized puddle
of water on my Ranger non-stick craft sheet, then dipped the tip of
the damp brush into the mica powder pot to "grab" a little mica powder
and swirled it into my puddle of water. Mixed very well... then viola... paint!
And beautiful, sparkly paint at that!
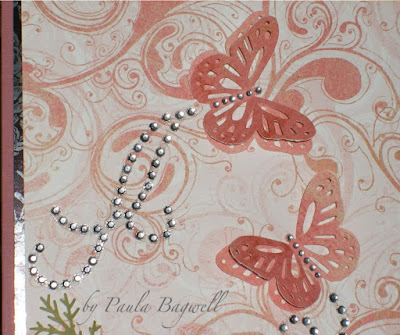
Click on the photo below to see how the Cotton Candy Pink sparkles!

(Butterfly and Leaf punches from Martha Stewart)
It was so, so easy to do, that I decided to just spray the Starbursts colors on to my craft sheet, too! I added a little water from the waterbrush, mixed it up and painted the same way! With painting, I had much more control over exactly where the color went! And much LESS mess than if I had actually sprayed the flowers individually themselves, especially to cover all sides of each of the petals!
After the flowers had all dried, I found that the Cotton Candy Pink ones were much more "sparkly" than the other two colors, even though they did have some sparkle as well. That's the power of "Magical Micas"!... so I 'painted' the Scintillating Silver Glitz Spritz on the top of the petals in the same fashion. The Glitz Spritz's just give the glimmer and let the color shine through! The result was spectacular! I could not be more pleased with how they turned out. :)
See how this color just sparkles!

And remember... the sparkle is even better in person!
If you haven't tried these products yet, visit their online store and try them out.
Anyway... back to the card... here's some final close-up pictures:


I punched two buterflies for each of the three on the card. To get the dimension, I just glued their bodies together with a Quickie Glue pen, and also only glued the body on to the paper. After completely drying, I was then able to lift the layers of wings up to make them seem as if they were in flight! CTMH Bitty Sparkles make up their tiny butterfly bodies, and I used some rhinestone flourishes from my stash (I think I got them eons ago at Walmart) for the fluttering trails!
Well... that's all for the FIRST Double-Twisted Easel Card! Whew!... never thought I'd get this all posted! I'll be posting the "second" one as soon as I can, because I'm entering it into a Blog Challenge.... read more about that in the next post!
You should be able to see the SECOND Double-Twisted Easel Card here. At least you will after I get it posted! LOL! If the link works then my work is done!
If not... stayed tuned!.......
New Uses for Glue Guns!
At least it's 'new' to me! :) ....
Make your own pearls and flower centers, OR make other embellishments
using molds and a LOW-TEMP glue gun..... then customize them to match
your cards, layouts, and other projects! I think this is a GREAT idea, and
wouldn't Magical Micas from Lindy's Stamp Gang make them look stunning?
Click HERE to watch on YouTube
Tuesday, October 18, 2011
Double Tag Card with 2 or 3 Pockets!
Christina from Card Making Magic, shows an easy double tag card using just ONE piece of 12x12 double-sided patterned cardstock - perfect for CTMH's new B&T's!!
Versatile design can make either:
1) a flat 2-sided card with 2 tags and 2 pockets, plus a 3rd pocket if
needed
2) a regular card with 2 tags and 2 pockets on the front that can stand
up like normal cards
3) or the whole thing can be attached to another card base for a
different look!
Versatile design can make either:
1) a flat 2-sided card with 2 tags and 2 pockets, plus a 3rd pocket if
needed
2) a regular card with 2 tags and 2 pockets on the front that can stand
up like normal cards
3) or the whole thing can be attached to another card base for a
different look!
Watch on YouTube: HERE
SUPER CUTE!
Saturday, October 15, 2011
My Oh My Oh My!....
I am in love with Lindy's Stamp Gang's Starburst Sprays,
Glitz Spritz' and Magical Mica's!! Ooooo so vibrant and shimmery!!
(I've also purchased a couple Moon Shadow Sprays and a couple
embossing powders, which I haven't tried yet, but I'm sure I'll love them
just as much!)
I recently ordered a bunch of colors, with extra tops, so I could have them both in a spray, and then be able to change to a dauber cap for a different application when needed.
These products are soooo versatile! I'm in the process of making some Anniversary Cards this month.... one for my sister and one for my best friend (both of whose dates are this month). I had ordered some white mulberry roses in 3 different sizes from "I Am Roses" to embellish the cards. I wanted to paint and/or spray them with LSG products to match my cards.... I actually "painted" with the sprays and a waterbrush! I just sprayed the Starburst Spray color of choice on to my non-stick craft sheet, added a little water from the waterbrush, and then painted each petal... easy, peasy! The roses turned out just absolutely GORGEOUS!!
I gave one card to my BFF today.... even though their anniversary was on the 4th... I was sick and didn't get it done in time :(
AND she LOVED it! As soon as I get my sister's card done, I'll post pictures of both cards.... I made both 6x12 Double-Twisted Easel Cards, so watch for them soon!
Glitz Spritz' and Magical Mica's!! Ooooo so vibrant and shimmery!!
(I've also purchased a couple Moon Shadow Sprays and a couple
embossing powders, which I haven't tried yet, but I'm sure I'll love them
just as much!)
I recently ordered a bunch of colors, with extra tops, so I could have them both in a spray, and then be able to change to a dauber cap for a different application when needed.
These products are soooo versatile! I'm in the process of making some Anniversary Cards this month.... one for my sister and one for my best friend (both of whose dates are this month). I had ordered some white mulberry roses in 3 different sizes from "I Am Roses" to embellish the cards. I wanted to paint and/or spray them with LSG products to match my cards.... I actually "painted" with the sprays and a waterbrush! I just sprayed the Starburst Spray color of choice on to my non-stick craft sheet, added a little water from the waterbrush, and then painted each petal... easy, peasy! The roses turned out just absolutely GORGEOUS!!
Here's a sneak-peak...

Can you see the shimmer? (click to make larger)
I gave one card to my BFF today.... even though their anniversary was on the 4th... I was sick and didn't get it done in time :(
AND she LOVED it! As soon as I get my sister's card done, I'll post pictures of both cards.... I made both 6x12 Double-Twisted Easel Cards, so watch for them soon!
Friday, October 14, 2011
Double Z-Fold Card
The card is so, so simple to make. Watch this short video to see how:
Watch on YouTube: HERE
See I told you it was EASY!
Thursday, October 13, 2011
And the REAL Wedding Cake was.....
SQUARE!!
Yep... the bakery didn't know the difference between a ROUND cake and a square one!! LOL!
Susi's written comment to me was... and I quote...
"Greg & I are grateful to you for BOTH our beautiful cakes! :)
(And the bakery is happy they didn't have to make train tracks out of fondant!) But square, really? What part of EXACT was soooo difficult.
AND btw, the florist (expecting a big ROUND cake) didn't have enough
of the ribbon...OOPS! She did a nice job compensating, though. They almost
had no ribbon, & then I was gonna cry. SERIOUSLY, PEOPLE, DON'T SCREW THIS UP!! :) And it was the florist to the rescue!"
Oh well, even though it's square, it was an honor to be the inspiration for it, and it was a beautiful cake anyway....

If you have no idea what I'm talking about, you can quickly catch up by checking out these past few posts! Just be sure to FIRST scroll to the bottom of the page and read the posts backwards, up to the top, so they'll be in order!
Yep... the bakery didn't know the difference between a ROUND cake and a square one!! LOL!
Susi's written comment to me was... and I quote...
"Greg & I are grateful to you for BOTH our beautiful cakes! :)
(And the bakery is happy they didn't have to make train tracks out of fondant!) But square, really? What part of EXACT was soooo difficult.
AND btw, the florist (expecting a big ROUND cake) didn't have enough
of the ribbon...OOPS! She did a nice job compensating, though. They almost
had no ribbon, & then I was gonna cry. SERIOUSLY, PEOPLE, DON'T SCREW THIS UP!! :) And it was the florist to the rescue!"
Oh well, even though it's square, it was an honor to be the inspiration for it, and it was a beautiful cake anyway....
Here's the Cake Table at her Reception!

Cake and mini-cake!
If you have no idea what I'm talking about, you can quickly catch up by checking out these past few posts! Just be sure to FIRST scroll to the bottom of the page and read the posts backwards, up to the top, so they'll be in order!
Monday, October 10, 2011
Beautiful Bride!
Well.... I finally have some photos from Susi's wedding to share! She made a beautiful bride and Greg makes her very happy.


CONGRATULATIONS Susi and Greg!
Friday, October 7, 2011
Petal Card
Another type of card is called the Petal Card. Beate from Splitcoast Stampers shows how easy it is to make these cards. She uses a beaded circle, but a classic circle or a scalloped circle can be used as well.... and I think I actually would like the scalloped one better! JMHO!
She does not specify the exact size of the beaded-circle she used, but it looked like about a 4-1/2" diameter one to me. What do you think?
She does not specify the exact size of the beaded-circle she used, but it looked like about a 4-1/2" diameter one to me. What do you think?
Watch on YouTube: HERE
Wednesday, October 5, 2011
Secret Panel Card
Christina from Card-Making Magic, shows how to make a secret panel card!
This is not very hard to do at all, but you might need to tell the recipient
that there's a "secret panel" and how to find it, or they may never know
it's there!
This is not very hard to do at all, but you might need to tell the recipient
that there's a "secret panel" and how to find it, or they may never know
it's there!
Watch on YouTube: HERE
Saturday, October 1, 2011
Easy Zipper Flowers
Linda Kaiser from the Paper Boutique, shows how to turn one-half of an 18" zipper into a really cute flower with it's own metal bling!
(So a yard of zipper will make 4 flowers)
Watch how in the first 6 minutes of this video tutorial. She also makes a card with the flower as an embellishment.
(So a yard of zipper will make 4 flowers)
Watch how in the first 6 minutes of this video tutorial. She also makes a card with the flower as an embellishment.
Click HERE to watch on YouTube
Aren't these really cute!
Tuesday, September 27, 2011
Veranda Sympathy Card
A dear friend of mine recently lost her sister-in-law quite unexpectedly. Since I have been out of store-bought sympathy cards for some time, I had to quickly put one together that was not bulky, so it could be mailed easily.
I took a quick picture of it before getting it off in the mail. This is what I
came up with:

I used the retired Veranda Paper Pack from CTMH, along with the matching Stickease. This set of paper and stickers sure made this really very simple to make on such short notice. I also used the RGB codes in MS Word for the matching sentiment. Sorry I didn't think about getting a shot of the inside of the card to show as well.
I really must get busy and make some sympathy cards up in advance, so I have them on hand when these unexpected and sorrowful situations arise.
Monday, September 26, 2011
Muslin Flowers
Tuesday, September 20, 2011
My ScrapRoom - Paula's Space! .... part 1
Ok... it's been awhile in the making, but I'm finally getting around to posting these photos of my scraproom, that Carol (the CTMH consultant that I help) "named" for me --- "Paula's Space". This is also the reason my blog is named the same!
When my wonderful husband, Brad, was building my shelves for my scraproom, Carol secretively snuck behind my back, and got him to give her the red paint he was using, so she could match these large 8" letters she lovingly painted and decorated for my wall. What a surprise these were! (My hubby sure can keep a secret!)

A little background info: After Brad was transferred to our new town, because of his job in 2004, we started building our new home late in that year. At that time, I was finally supposed to get my own 'space' for my scrapbooking/cardmaking area! YAY!...
We were to be leaving our eldest, Josh, in the city we moved from, and our daughter, Jennifer, was half way across the nation from us, in her senior year at college in Virginia, swearing that she'd "NEVER" move back home! So.... I designed our home according to those plans, but.... as you can probably guess, it did NOT quite work out that way!
By the time the house was finished at the end of April 2005, Jen was planning on returning home after her May graduation (for a little while anyway!) She had accepted a job here in town during her Spring Break holiday in March, and they were holding the job open for her!
There went my ROOM! I didn't even get it for short time, because 3 days after we closed on the house, we had to leave for Virginia for her graduation! Oh well :( ... the time would come! Short-sightedly, I went ahead and put carpet in the room, which we have not changed yet, but eventually we will.
OK... maybe this is more like a "lot of background info"! But bear with me, I'm almost done!.....
Since we also now had a finished and carpeted basement, I was seriously contemplating moving my currently non-existent 'area' down there.... being held back by the fact that because of surgery, I didn't do stairs very well, and the bathroom was upstairs from there!.... So I started 'practicing' going up and down the stairs 2-3 times per day. Just about had myself convinced that I could do it, when our son decidied that he didn't like staying where he was anymore, and wanted to come back home, too! Now the basement idea was smashed as well! LOL! He took it over in September 2005! Now both the kids were home again! Not what I had planned at all! LOL! :)
Well finally, Jen found an apartment and moved out in May 2007. I could now have my long-awaited scraproom! My hubby got started building as soon as I had the plans drawn up of how I wanted the room laid out! (side-point... Josh moved out again in Dec '07, too!)
So, thanks for bearing with me!!... the photos of my 'space' are below:
I took a bunch... and I do mean a bunch... of photos, going around the room starting on the left side, behind the door! My space is an 11 x 15 foot bedroom with closet... nice and large! I've basically done it in red, black, and white, with a plethora of other colors thrown in, too! As always, you should be able to click each photo for a larger view.
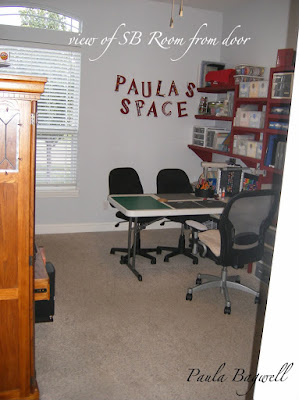
First - a view from the door....


I need to set aside some time to re-label my drawers. Just inside the front of each drawer, I added black cardstock with a patterned red-floral piece on the left side, so that all the drawers were uniform and hid the contents clutter inside. I had attached the labels long before, and I think they look so willy-nilly now with the black background, and need to be attached in a more dignified and orderly manner! (Can you tell that I'm a little OCD!)


The tray on top holds the mini ink pads and my Smooches!
When my wonderful husband, Brad, was building my shelves for my scraproom, Carol secretively snuck behind my back, and got him to give her the red paint he was using, so she could match these large 8" letters she lovingly painted and decorated for my wall. What a surprise these were! (My hubby sure can keep a secret!)

A little background info: After Brad was transferred to our new town, because of his job in 2004, we started building our new home late in that year. At that time, I was finally supposed to get my own 'space' for my scrapbooking/cardmaking area! YAY!...
We were to be leaving our eldest, Josh, in the city we moved from, and our daughter, Jennifer, was half way across the nation from us, in her senior year at college in Virginia, swearing that she'd "NEVER" move back home! So.... I designed our home according to those plans, but.... as you can probably guess, it did NOT quite work out that way!
By the time the house was finished at the end of April 2005, Jen was planning on returning home after her May graduation (for a little while anyway!) She had accepted a job here in town during her Spring Break holiday in March, and they were holding the job open for her!
There went my ROOM! I didn't even get it for short time, because 3 days after we closed on the house, we had to leave for Virginia for her graduation! Oh well :( ... the time would come! Short-sightedly, I went ahead and put carpet in the room, which we have not changed yet, but eventually we will.
OK... maybe this is more like a "lot of background info"! But bear with me, I'm almost done!.....
Since we also now had a finished and carpeted basement, I was seriously contemplating moving my currently non-existent 'area' down there.... being held back by the fact that because of surgery, I didn't do stairs very well, and the bathroom was upstairs from there!.... So I started 'practicing' going up and down the stairs 2-3 times per day. Just about had myself convinced that I could do it, when our son decidied that he didn't like staying where he was anymore, and wanted to come back home, too! Now the basement idea was smashed as well! LOL! He took it over in September 2005! Now both the kids were home again! Not what I had planned at all! LOL! :)
Well finally, Jen found an apartment and moved out in May 2007. I could now have my long-awaited scraproom! My hubby got started building as soon as I had the plans drawn up of how I wanted the room laid out! (side-point... Josh moved out again in Dec '07, too!)
So, thanks for bearing with me!!... the photos of my 'space' are below:
I took a bunch... and I do mean a bunch... of photos, going around the room starting on the left side, behind the door! My space is an 11 x 15 foot bedroom with closet... nice and large! I've basically done it in red, black, and white, with a plethora of other colors thrown in, too! As always, you should be able to click each photo for a larger view.
First - a view from the door....

From the door, you can see those large letters Carol made on the wall. Every time I go in, they are such a delightful reminder that I have such a sweet and generous friend, and they welcome me into my "space"!
You might be wondering why they don't look 'centered' on the wall..... because they're not... at least not anymore! They were originally, when my room was ready for "move in" back in the summer of 2007! But since then, I've acquired quite a bit more stuff, since that was 2 years prior to me finding out about CTMH in 2009! So my hubby has had to build me some more shelves in that corner, which then made my 'sign' off-centered! It drives me a little crazy - just a little bit :) - but since I don't want to have to ask my DH to re-paint that wall, I live with it as is.... maybe one day I'll have him move them!

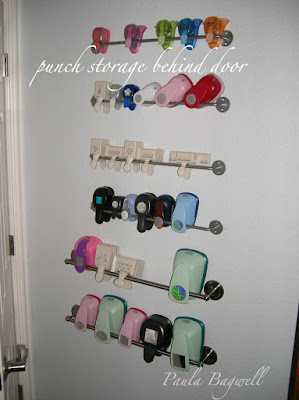
Behind the door, is my storage area for my larger punches. The top 4 bars are from Ikea. My daughter sent them to me, since I'm not anywhere near an Ikea store and these are not available online. They are the Bygel racks, each a 20" long bar and were only $1.99 each! The bottom 2 are just regular 24" towels racks from Walmart. My Xtra-Giga Marvy Uchida punches, as well as some other extra large brands, would not fit on the Ikea rails... they were too wide in depth, so the rails weren't out from the wall far enough to accommodate them. I keep my smaller punches and those that can't sit on a rail, in one of my drawers you'll see later on.
Next up, is my computer armoire and printer stand/storage.... above it hangs a very old painted window frame, from an old house in Virginia, that is only half visible in the photo (my walls are 10 feet high!)

In between the printer and the closet, is a storage center of drawers with a rolling paper cart underneath and a magnetic bulletin board above. This was one of the later items my DH made... a table-topped shelf sturdy enough to hold the side-by-side drawers I had to add. (notice... "had to"! lol!) And the top had to be tall enough off the floor to accommodate easy access to my 4th paper rolling cart I had to add as well. (You'll see the other 3 soon!)
The drawers hold everything from chipboard, slide mounts and alphabet sets to grungeboard, vacation and Basic Grey embellishments! Photos of the kids when they were 3 and 5 are in frames on top.

The paper rolling cart, below the drawers, hold my pre-CTMH paper sets from other companies like Paper Loft, Basic Grey, etc.
Next is my closet... nothing special since it's a normal bedroom closet, but it does have some shelves that hold stuff like all my extra CTMH Cardstock Paper Packs I stocked up on! Containers (yes, plural!) of extra adhesives... I keep a lot of that on hand at all times. Also has my albums that are in process, all of my packages of card bases and envelopes, and a slew of other miscellaneous items. The closet also houses my
Crop-n-Style XXL rolling carrier tote for crops!
My favorite feature of the closet is the hanging beaded curtain where the door should be!

I had my hubby remove the closet door so I could hang these up! They are black teardrop beads, formed in a cascading pattern. So retro! I love them! From the '70's, which is when I was a teenager and I so badly wanted them back then, but Mom said no, because they were for hippy's, you know... 'flower children'! LOL!.... Well I'm now rebelling! :)
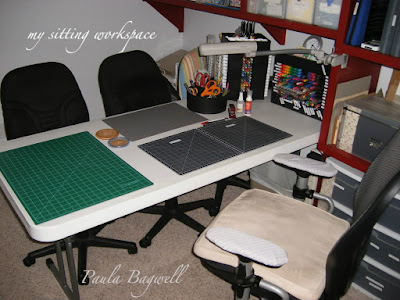
This is a view of my desk:

It's only clean because I moved stuff off of it for the photo shoot!
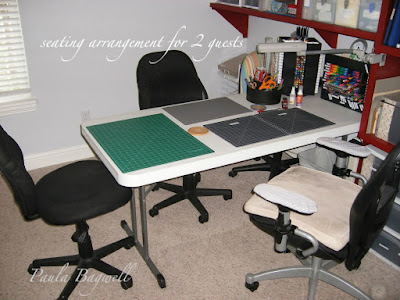
Next is how I arrange the workspace for myself and 2 guests:

When the black chair is at the end of the table like this, there is still enough room to walk between it and the double-drawer stack/rolling cart against the wall behind it.
This next pic is a close-up of where I sit, with my Ott-Lite above me and everything within easy reach:

My tool caddy is from Pampered Chef. You can see the CTMH ink pad and marker tower in the middle. On the right is another of my hubby's creations.... I bought 3 extra marker towers and he built a box around them (laying horizontally). I store all my pre-CTMH markers in this, as well as Slick Writers, Millenium Pens, and all my Sakura Gelly Roll sets!... very handy!
Of course this is the front of the tower: and this is the back!


I have a 1/4 of a sponge for each of the 60 CTMH colors! I used a SU label punch and the cardstock swatches, punched out each color where the name was printed on it and attached with staples as my fingerhold for each sponge. Then I used velcro adhesive-backed dots to cover the staple ends and attach them to the caddy, making sure I put the soft-sided piece of velcro on the sponge tab... no need to have my fingers hurt after using them! The opposite side of those little velcro pieces are very rough!
Continued in Part 2 .... I promise, it's not as long, and shows most of the storage areas!
My ScrapRoom - part 2
Apparently the first part is too long, so I must break this "room" in half! :)
Moving on around to the right from the closet is the shorter wall with the window and my "Paula's Space" sign. Then on around is this:
This section of shelves from the corner to over my table (next photo) was the last thing my DH installed for me! These shelves hold binders of templates, my embossing gun holder my hubby made me... for hands free embossing!... lots of ribbon containers, my Creative Cafe embellishments, the bling box I covered with Magnifique (see here.), and my cardboard spritz box with my Lindy's Stamp Gang sprays. The red baskets up top hold embossing gun, powders, and supplies, and the other holds all my non-CTMH ink pads and reinkers, like Versamark and Stazon. On the floor are side-by-side racks I purchased from a LSS when they went out of business. I use it to store my 12x12 chipboard, all my CTMH Idea Books, and a few other miscellaneous flat items.
Next photo is of the other half of the newest shelves which are located over my table end above the extra box of markers on my desk. These shelves hold all my CTMH stamp sets and Acrylix Block Organizer Case, as well as my 8x8 papers and border CS strips.

You may be able to tell by looking at the bottom shelf, that these shelves fit 2 deep of the My Acrylix Organizer boxes... and yes... all but one of them are 2 deep and all are full or almost full.... 15 boxes with over 200 stamp sets and counting!! Am I insane or what! LOL!
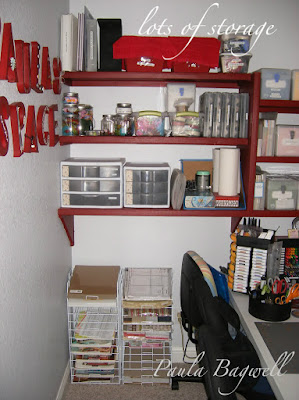
In this next photo, you will see the first shelving unit my hubby built for me:

It was too wide to get a straight-on shot, so I had to take it at an angle. It stands 7 feet high and over 5 feet long! My chair sits right next to this, so everything low is within hands-reach! I store all of my larger tools like paper cutters, Crop-A-Dile and Big Bite, and smaller ones I don't keep in my desk caddy, in the wider drawers on the bottom left. Adhesives go in the 3-drawer middle section, and more tools I don't use as often and my smaller punches are in the 3-drawer right section... then my paper shredder!
Storage on the shelf above hold stickers, rub-ons and other embellishments. The next shelf up holds 4 containers full of photos waiting to be scrapped, my E-size SS, a zippered decorative scissors case, an extra stamp pad tower, and 6 of the CTMH little jar cases with... what else?... CTMH embelly's!!
The two skinny shelves above that hold sectioned boxes of all the other brands embelly's - brads, buttons, and more! Top shelf has more storage drawers, chalk box, and 2 boxes for card-making supplies and finished cards. I actually have an empty space about 8 inches wide for growth! LOL! :)
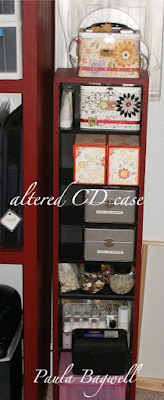
Next is an old cd holder that Brad painted to match. It holds two storage tins for CTMH items too large for the little jars like waxy flax (one decorated in Bella Paper - see here), all 60 reinkers in 4 different boxes (see two of them here), 6 clear jars of all my CTMH buttons, some paint daubers, and stamp sets from other companies in the pink box on the bottom shelf.
Above this little shelf, are more shelves that stretch from the large shelving unit to the corner. They hold my Cuttlebug and supplies, my Distress inks and paints, dimensional paint, Mudd Puddles, binder of brass stencils, idea catalogs, metal impress set, and all 6 of the CTMH Books.

Then on the side wall, also up in that corner, is the 'tall' work station table/storage unit my hubby had first made when he made the large shelving unit:
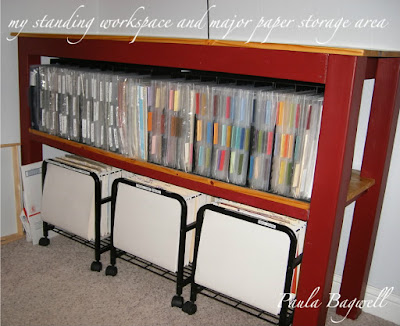

This is also my major paper storage area --- Brad made this tall enough for the 3 rolling paper carts to go easily under it, and it is almost 4 feet tall... which is perfect standing work-level for me since I'm 6'1". Those carts hold all non-CTMH cardstock and loose patterned papers, as well as all my specialty papers.... mulberry, vellum, mosaic, overlays, etc. All 4 of my carts are stuffed, and I can't fit anything else into them!
On the shelf above the carts, are all my CTMH paper packs and cardstock! To put this in perspective, this unit is 6 feet long! Starting in the middle of that shelf, I have a few sets of more specailty papers I could not fit in the carts below.... these have windows pre-cut in them for custom matting of photos!
From the center to the left, are all the CTMH Level 1&2 Paper Packs I've acquired over the last 2 years.... many older ones through Carol off the Buy/Sell Bulletin Board (pre-2009 sets!) I have these separated by Cropper Hopper Paper Files. I love these because they are actually tabbed pockets, 3 per set, so I can put the paper set name on the tabs, and each pocket holds the scraps! I have these alphabetized from Bella to You Rock!
From the center to the right, are all 60 of the CTMH cardstock colors, separated the same way. I did use another of the CS color swatches and cut a strip of each to fold over each tab, so I can see the colors from both directions without having to look at the color names. I did not use the swatch part with the color name on it this time, like I did for the sponges, because the words are too small to see, so I wrote the color name on them in large print.
Above this workspace is another Ott-Lite attached to a wall-mounted board housing 144 embellishment bins that are about 3"x3".

And as you can see by the light switches in the photo above, we are finally back at the door! But one final photo I just can't leave out....

I hope you've enjoyed the 2-part tour of my scrapbook room. And maybe, just maybe, I've given someone a storage idea they can use as well!
Thanks for stopping in! :)
Moving on around to the right from the closet is the shorter wall with the window and my "Paula's Space" sign. Then on around is this:

This section of shelves from the corner to over my table (next photo) was the last thing my DH installed for me! These shelves hold binders of templates, my embossing gun holder my hubby made me... for hands free embossing!... lots of ribbon containers, my Creative Cafe embellishments, the bling box I covered with Magnifique (see here.), and my cardboard spritz box with my Lindy's Stamp Gang sprays. The red baskets up top hold embossing gun, powders, and supplies, and the other holds all my non-CTMH ink pads and reinkers, like Versamark and Stazon. On the floor are side-by-side racks I purchased from a LSS when they went out of business. I use it to store my 12x12 chipboard, all my CTMH Idea Books, and a few other miscellaneous flat items.
Next photo is of the other half of the newest shelves which are located over my table end above the extra box of markers on my desk. These shelves hold all my CTMH stamp sets and Acrylix Block Organizer Case, as well as my 8x8 papers and border CS strips.

You may be able to tell by looking at the bottom shelf, that these shelves fit 2 deep of the My Acrylix Organizer boxes... and yes... all but one of them are 2 deep and all are full or almost full.... 15 boxes with over 200 stamp sets and counting!! Am I insane or what! LOL!
In this next photo, you will see the first shelving unit my hubby built for me:

It was too wide to get a straight-on shot, so I had to take it at an angle. It stands 7 feet high and over 5 feet long! My chair sits right next to this, so everything low is within hands-reach! I store all of my larger tools like paper cutters, Crop-A-Dile and Big Bite, and smaller ones I don't keep in my desk caddy, in the wider drawers on the bottom left. Adhesives go in the 3-drawer middle section, and more tools I don't use as often and my smaller punches are in the 3-drawer right section... then my paper shredder!
Storage on the shelf above hold stickers, rub-ons and other embellishments. The next shelf up holds 4 containers full of photos waiting to be scrapped, my E-size SS, a zippered decorative scissors case, an extra stamp pad tower, and 6 of the CTMH little jar cases with... what else?... CTMH embelly's!!
The two skinny shelves above that hold sectioned boxes of all the other brands embelly's - brads, buttons, and more! Top shelf has more storage drawers, chalk box, and 2 boxes for card-making supplies and finished cards. I actually have an empty space about 8 inches wide for growth! LOL! :)
Next is an old cd holder that Brad painted to match. It holds two storage tins for CTMH items too large for the little jars like waxy flax (one decorated in Bella Paper - see here), all 60 reinkers in 4 different boxes (see two of them here), 6 clear jars of all my CTMH buttons, some paint daubers, and stamp sets from other companies in the pink box on the bottom shelf.

Above this little shelf, are more shelves that stretch from the large shelving unit to the corner. They hold my Cuttlebug and supplies, my Distress inks and paints, dimensional paint, Mudd Puddles, binder of brass stencils, idea catalogs, metal impress set, and all 6 of the CTMH Books.

Then on the side wall, also up in that corner, is the 'tall' work station table/storage unit my hubby had first made when he made the large shelving unit:


This is angled more so you can see the beautiful wood top he made!
This is also my major paper storage area --- Brad made this tall enough for the 3 rolling paper carts to go easily under it, and it is almost 4 feet tall... which is perfect standing work-level for me since I'm 6'1". Those carts hold all non-CTMH cardstock and loose patterned papers, as well as all my specialty papers.... mulberry, vellum, mosaic, overlays, etc. All 4 of my carts are stuffed, and I can't fit anything else into them!
On the shelf above the carts, are all my CTMH paper packs and cardstock! To put this in perspective, this unit is 6 feet long! Starting in the middle of that shelf, I have a few sets of more specailty papers I could not fit in the carts below.... these have windows pre-cut in them for custom matting of photos!
From the center to the left, are all the CTMH Level 1&2 Paper Packs I've acquired over the last 2 years.... many older ones through Carol off the Buy/Sell Bulletin Board (pre-2009 sets!) I have these separated by Cropper Hopper Paper Files. I love these because they are actually tabbed pockets, 3 per set, so I can put the paper set name on the tabs, and each pocket holds the scraps! I have these alphabetized from Bella to You Rock!
From the center to the right, are all 60 of the CTMH cardstock colors, separated the same way. I did use another of the CS color swatches and cut a strip of each to fold over each tab, so I can see the colors from both directions without having to look at the color names. I did not use the swatch part with the color name on it this time, like I did for the sponges, because the words are too small to see, so I wrote the color name on them in large print.
Above this workspace is another Ott-Lite attached to a wall-mounted board housing 144 embellishment bins that are about 3"x3".

If you look closely, they all have something in them!
Not an empty one!

This is Bear... our daughter's Rotty that we gave her just before
her final semester of college. After she graduated and came home,
he's been with us ever since! Apartments won't take
120 lb Rottweilers! Even a sweet boy like this!
So even though she's lived in 3 different states since then,
Bear has been my scrapbooking companion!
Thanks for stopping in! :)
Sunday, September 18, 2011
Penny Slider Card
In this video, Christine from Card Making Magic, shows how to make a very cute and easy roller card called a Penny Slider Card. I just love her video tutorials! She makes it all so easy to follow. I hope you like this one, too :)
Watch on YouTube: HERE
Add Sentiments to Cards Using MS Word
I'm so glad I ran acrosss this video from Linda Kaiser (Paper Boutique)
on how to use MS Word, instead of Photoshop, to add sentiments inside
of shapes for your cards.... even printing out on patterned paper! It's
really very easy and I had no idea Word could even do shapes...
on how to use MS Word, instead of Photoshop, to add sentiments inside
of shapes for your cards.... even printing out on patterned paper! It's
really very easy and I had no idea Word could even do shapes...
I am Word 'challenged'! I actually need an instructional book on
MS Word for Dummies :) Do they publish that? LOL!
Click HERE to watch on YouTube
Hope this helps you as much as it does me!
Painting with Starburst Stains
Arlene, one of the Lindy's Stamp Gang designers, shows how easy it is to paint with their shimmery Starburst stains! Oooo pretty, pretty!.... She includes a tutorial on an absolutely beautiful card she made using this technique. I've got several of these stains already, but of course none of them are the ones she uses, so.... I guess it's time to go shopping!
Watch on YouTube: HERE
Shop Lindy's Stamp Gang here!
Saturday, September 17, 2011
Another Gel Card!
In this short video from Splitcoast Stampers, Beate shows another
"version" of a gel card... just some slight differences from Tresa's
gel card - shown here.
One difference is that this one has the image in 'water' - aka gel - on
paper behind the opening, instead of on the inside of the card. The
whole gel part is then attached to the front of the card base using
pop-up dots to accommodate the depth of the gel pack!
So now I have a couple choices on how to make these gel cards!
It just depends on what I want the inside of the card to look like!
Enjoy the tutorial:
Watch on YouTube: HERE
Subscribe to:
Posts (Atom)
